This post was written by Mrignayni and edited by Adete from Team InVideo
Unlike Reels and other video features, Instagram Live allows you to stream a live session for 4 hours. Launched in 2020, this content format has become one of the most popular on the platform and is a great tool to improve engagement, connect with your audience, and build your brand. It is an important content format to leverage if you want to create impact.
That's why we've put together a guide on how you can use Instagram Live for your business. We also share some cool ideas you can try for your next live session, a few tips on how you can make the most out of Instagram Live, and how you can repurpose your live video to create multiple smaller videos using InVideo's Instagram Video Editor.

Here’s what we cover:
- Why should you use IG Live for your business
- How to start Live rooms
- How to host a great Instagram Live
- How to repurpose your IG Live content
- 10 IG Live ideas to get you started
- Wrapping up
Let’s get started with the benefits of Instagram Live for your business.
Why you should use IG live for your business
Instagram is saturated with millions of accounts trying to promote their content and get the attention of potential customers. And going Live on Instagram helps businesses stay relevant and reach new customers online. Below, we’ve listed 3 other benefits of using Instagram Live that’ll make you want to leverage it right away.
A. Connect better with your audience
Unlike pre-recorded Instagram stories and Reels, Instagram Live’s unedited stream allows the audience to witness the authentic and humane side of your business. It also helps you interact with your audience in real-time, which helps you build a strong connection and gain valuable insight and feedback from them.
B. Get more visibility
Every time you go live on Instagram, followers who have subscribed to your content will receive an in-app notification. The Instagram algorithm will also push your live in front of stories, so it has greater chances of being discovered and watched by your audience.
C. Improve your engagement
Instagram Lives creates room for a two-way conversation as viewers can pose questions through stickers and comments, and you can respond to each of them, which leads to increased engagement on your post.
The best part is that you can boost engagement by converting snippets of your Live into regular Instagram posts, Reels, videos, and even Instagram Ads. If you’d like more insights on how you can use other features of Instagram to grow your business, then check out this guide.
Pro-Tip: You can use InVideo’s Instagram Video editor to convert your IG Lives into other video formats that continue bringing engagement to your posts.
Now that you know why IG live is important let’s look at how you can set it up for your business.
How to go live on Instagram — a step-by-step guide
Here’s our step-by-step breakdown of how to do Instagram Live:
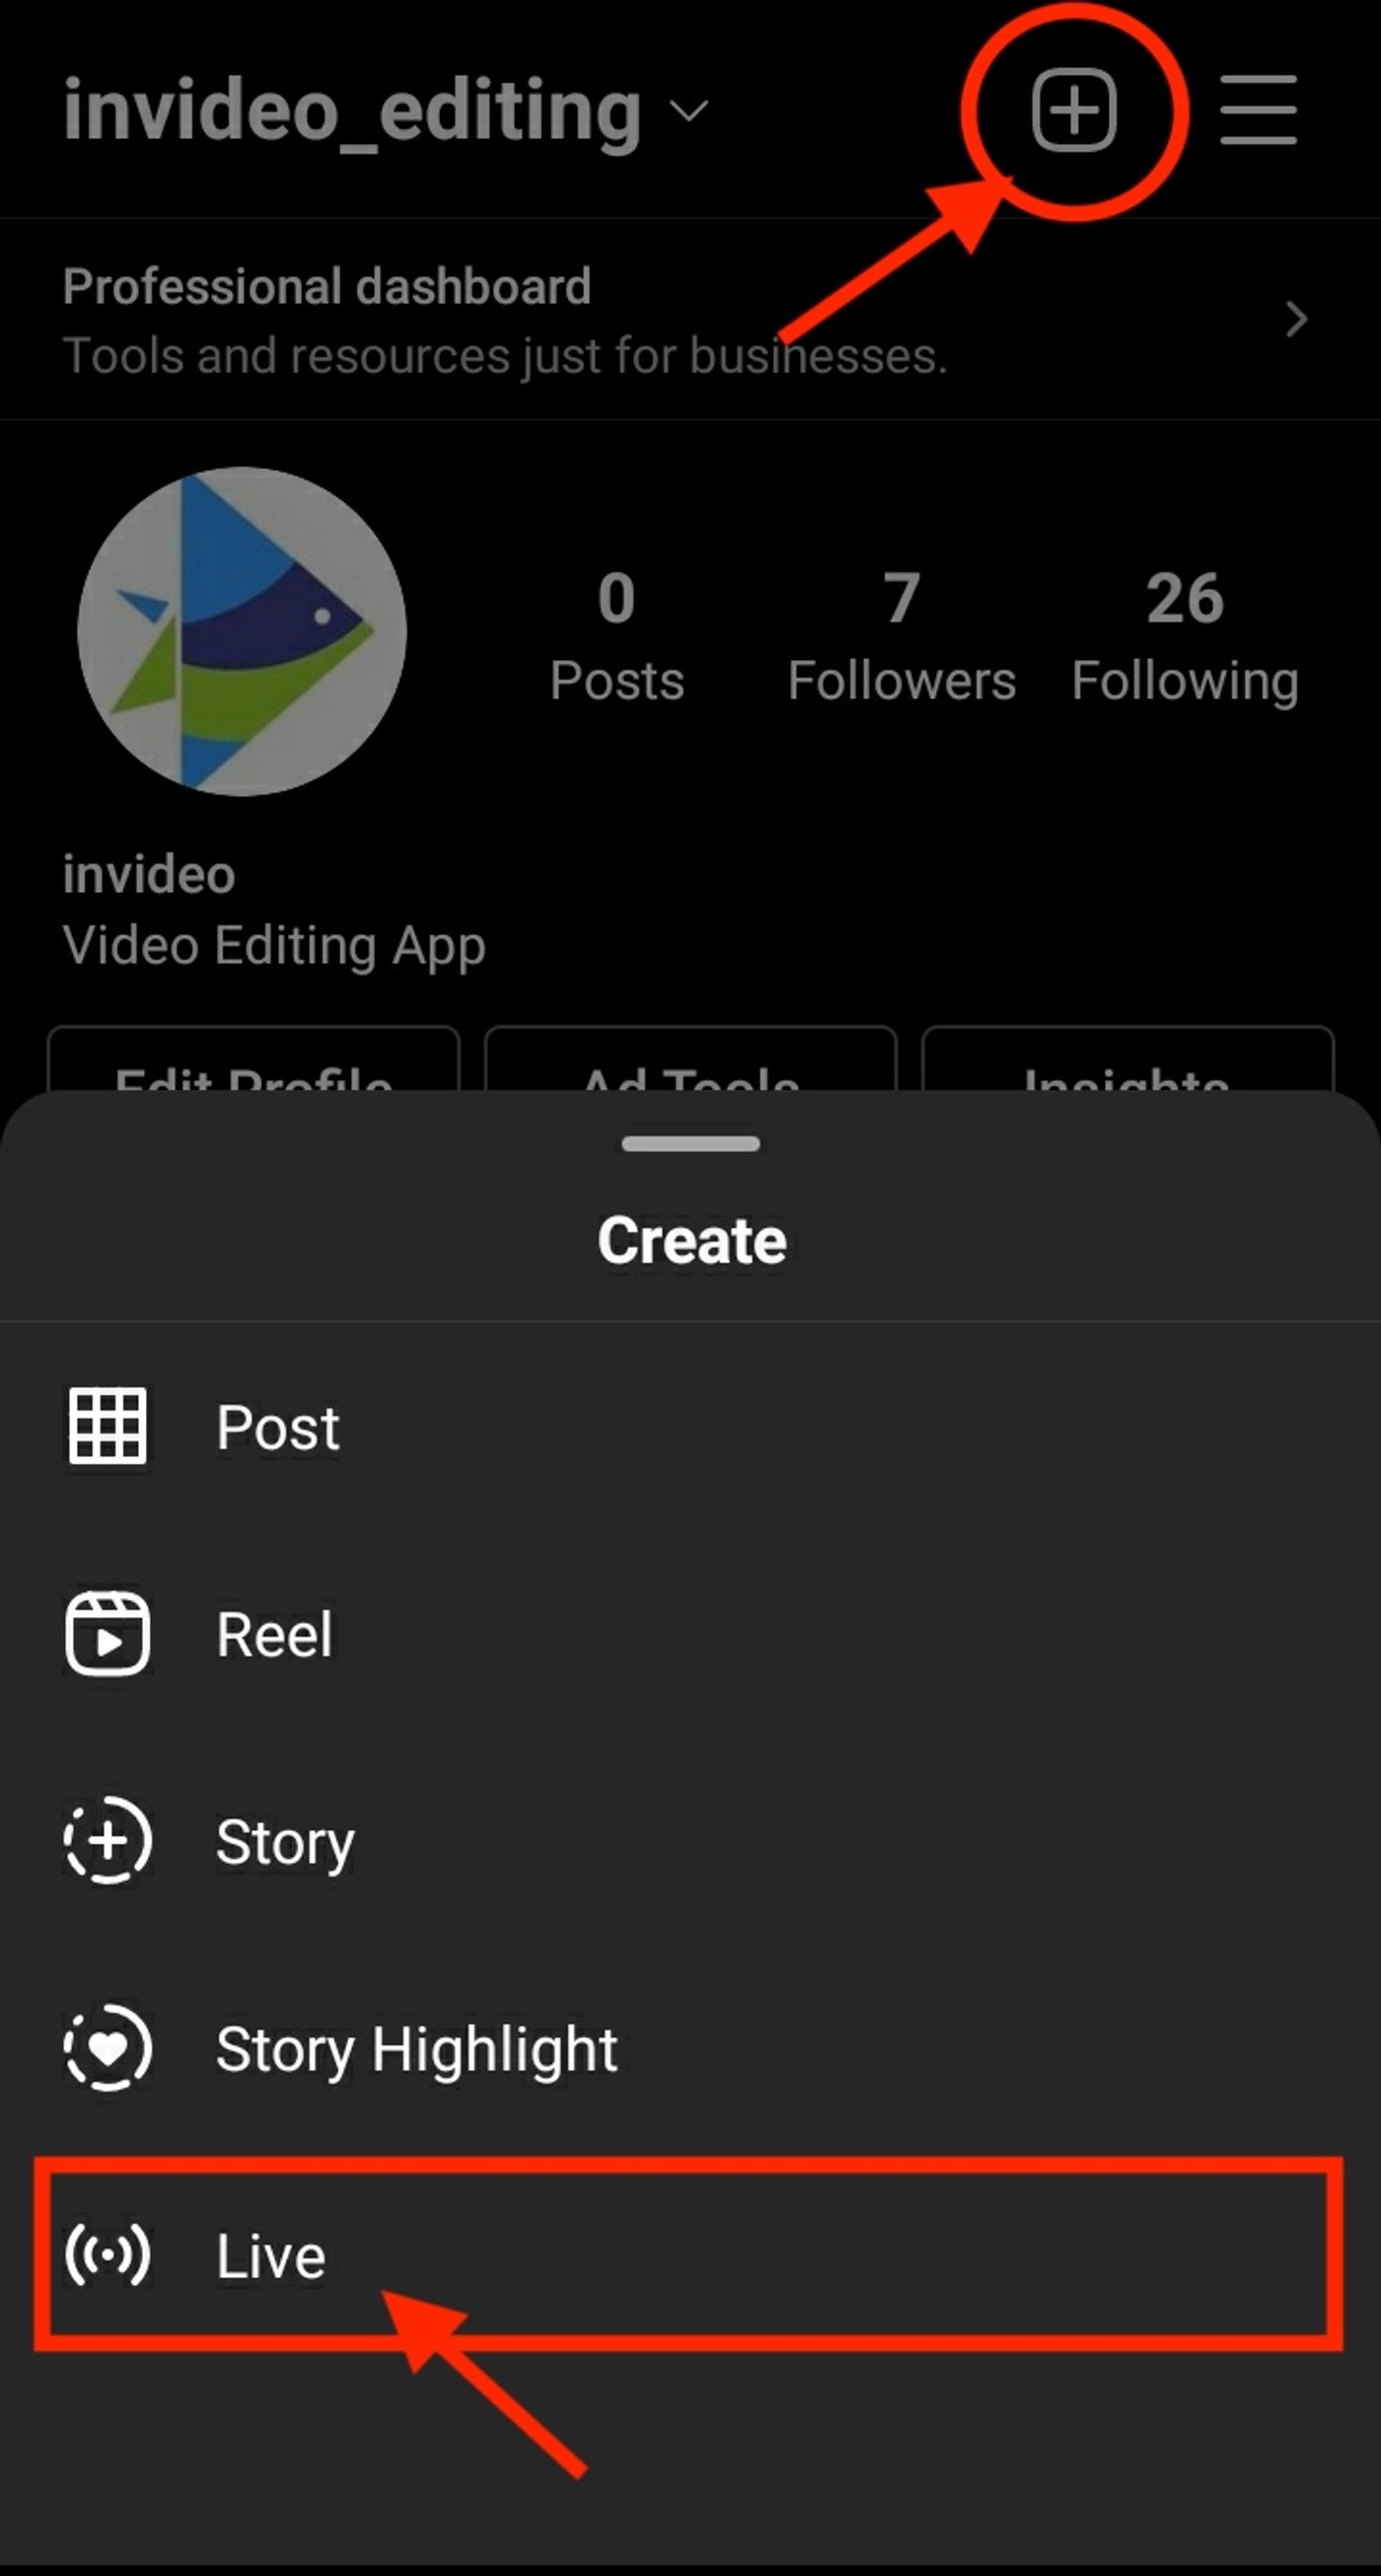
Step 1: Open the Instagram app, tap the ‘+’ icon at the top right of the screen, and choose the Live option.
Step 2 - Adding a title
You’ll see a screen with three icons on the left side. To add a title to your IG Live, select the first icon with the three horizontal lines.
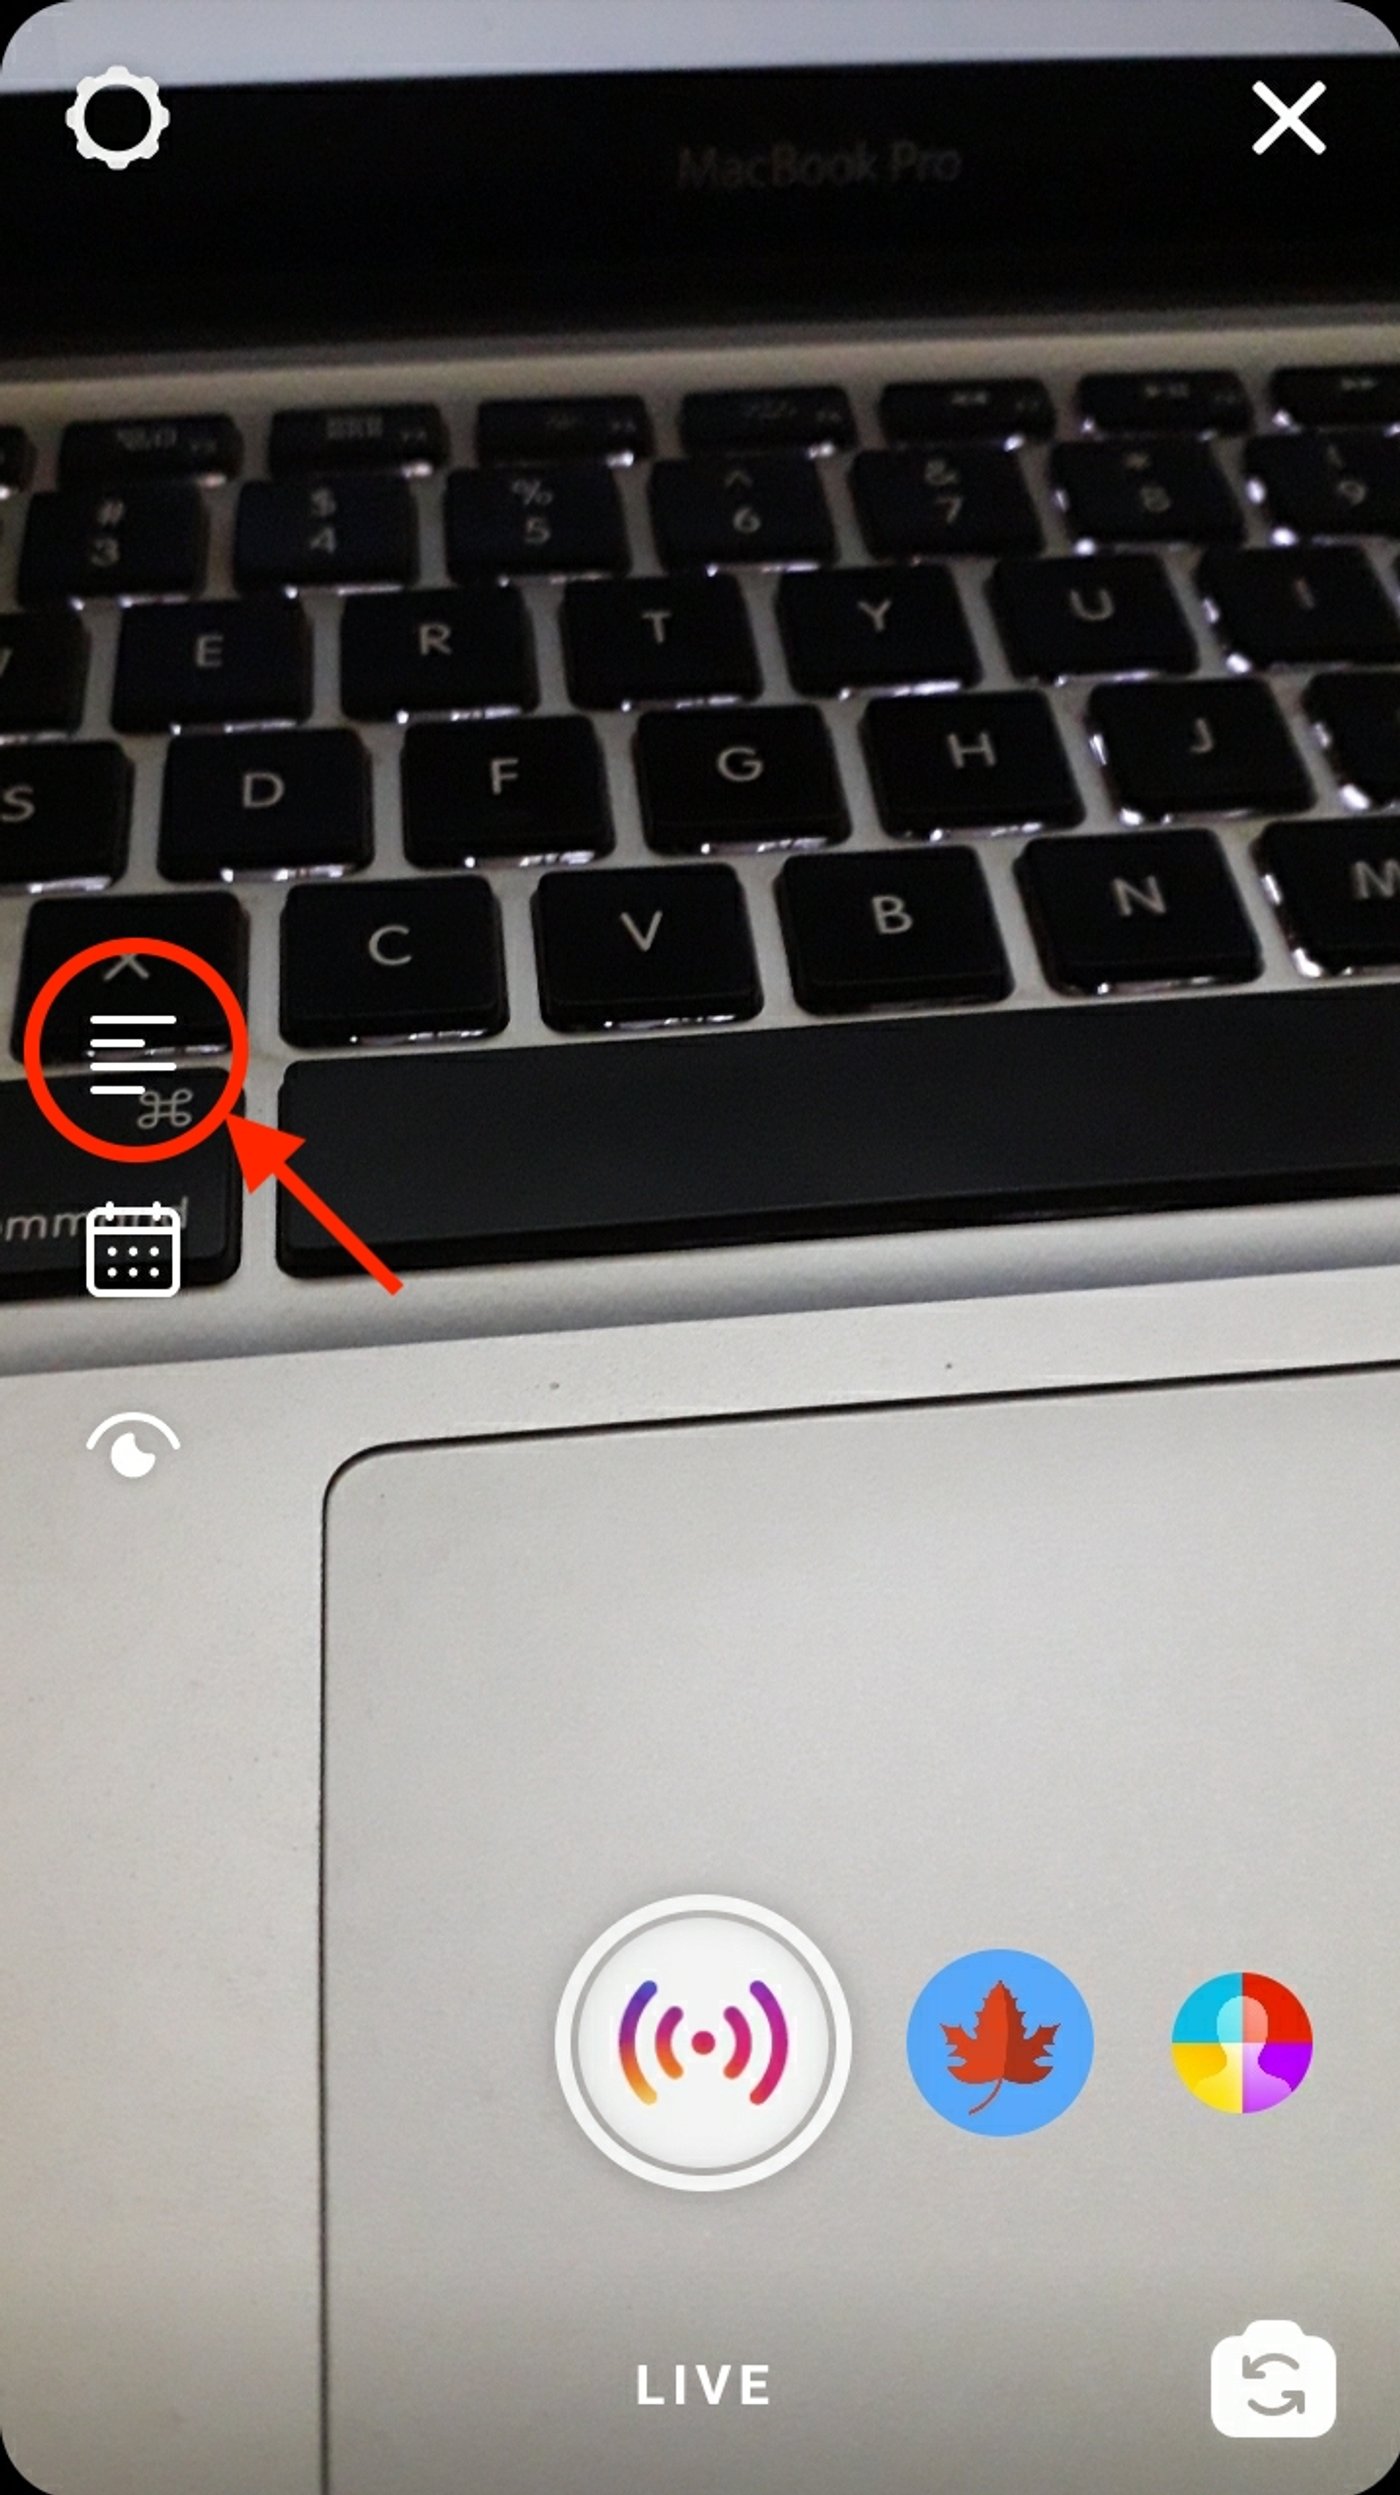
Simply enter the title for your IG Live in the blank space and select Add Title.

Step 3 - Choose your audience
You can practice before your live using a practice room option or go live in front of an audience with the Public audience option. (More on practice rooms in the later section.) Go to the “eye” icon, choose Public and tap Set Audience to choose your audience.

Step 4 - Go live
Once you click the IG Live icon at the bottom of the screen, Instagram will check your connection, and your live stream will begin!
You’ll know you’re streaming when a small red box with ‘Live’ on it appears at the top right side of the screen, and a message flashes on your screen that says, ‘You are now live!’
Give it about a minute or two for more and more people to start trickling in. Until then, be sure to keep welcoming the attendees as they join. And just like that, you’ve started your first Instagram Live!
At the bottom of the screen, you’ll see a vertical stream of comments and likes (in the form of hearts) from followers, as well as the usernames of new users who have joined. Here’s how to hide comments on Instagram live — you can disable them with just a simple tap on the screen.
Now, let’s also take a moment to go through each of the icons that appear in the top right corner.

- Tapping the topmost ‘X’ icon will end your session. Don’t worry if you hit this by accident during your live stream, though, because Instagram will ask you for additional confirmation before pulling the plug.
- Below that is a mic icon. Tapping on this will help you toggle your audio on and off. The same goes for the video camera icon right below that, except that it’s for video.
- Below that, you’ve got the icon that lets you toggle between your primary camera and secondary camera, depending on what you want to show.
- The final icon — right at the bottom — represented by sparkles will bring up your saved filters, which you can pop on during the session as well. Once you select the icon, the filters will appear as icons on the bottom of the screen under the comments box.
Step 5 - How to take viewers’ questions

Tapping on the third icon, represented by a speech bubble with a question mark, allows you to view any questions your viewers may have sent for you.
Once you open that up, it should look something like this.

You also have the option to tap on the question to show it to the rest of your viewers as well.
Step 6 - How to DM your IG Livestream
Do you want to share your Instagram Live stream with a friend? No sweat.
On your far right, you’ll find an icon that looks like a paper plane. If you’re well-versed with Instagram, you’ll know this is the direct message icon.

You can directly message a link to the live session to any Instagram user you’d like. Once you tap the icon, you’ll be shown another menu where you can select the user.

All you have to do is select their Instagram handle and tap the ‘Send’ button at the bottom, and they will instantly receive a link to your Instagram Live.
Step 7 - How to add more people to your IG live
Click the people icon and add the names of the people you’d like to add. You can add up to 4 people on your Instagram Live.

Step 8 - How to moderate comments in IG Live
Comments are at the heart of Instagram Live. They make it a fun and interactive space. But you never know what can happen on live streams, and if you’re worried about trolls or someone spamming your comments section with inappropriate language, there’s a quick fix for that.
Head on over to your Instagram settings, represented by the gear icon on your profile. Next, tap Privacy and then Comments.

Turn on the toggle button for the Hide Inappropriate Comments option. You can also filter out specific keywords here using the Manual Filter option.
The setting will apply across your posts, stories, reels, and live videos.
Step 9 - How to share your IG Live Stream
So far, we’ve walked you through setting up an Instagram Live, adding guests, and moderating comments. Once the session is wrapped up, there are a few options you have. First off, you’ll be presented with an end screen that looks like this.

At the bottom, you’ll see a Share to IGTV option, which allows the session to live on your page for the long term.
We also recommend saving the session by hitting the download icon. Remember — this is the only time you can download Instagram Live videos, so don’t miss out on this crucial step.
Bonus step - Schedule your live
Instagram rolled out a scheduling feature for its Live in 2021. It allows users to schedule Lives at least 90 days in advance, and it puts Instagram on an even footing with other social media platforms like Facebook and Tiktok. To schedule your live, click the calendar icon on the left, and add the title of your IG Live.

Once you’ve entered the title, tap Start Time to set the date and time of the event and press Done. Next, tap Schedule Live Video to schedule your Live.

Now, tap the Share as Post, and Instagram will help you create a post with event details like the title and start time.

Choose the post you’d like to share and select a filter. Then, add a caption to it, and once you’re satisfied, tap the tick to share your post. You’ll see a post with a reminder like the one on the right side.

The actual Livestream may be a one-time event, but there’s so much content in there that you can repurpose it in different ways. We'll cover this in detail later, but for now, let's look at how you can go live with multiple people on Instagram Live.
How to start Instagram Live rooms
The Instagram Live rooms feature allows you to go live with 3 people at the same time (previously, you could go live with only one person.) It helps you tap into the audience of your co-hosts, engage with their community and drive more conversions for your business. In this section, we’re going to outline the importance of Live rooms and how you can create one.

Why you should consider using Live Rooms
Here are some reasons you should use Live Rooms for your business
1. Monetize your content
Instagram Live rooms has a feature called badges that allow you to get paid for the value you provide. Essentially, your viewers purchase a badge if they’re enjoying your content, and they get special hearts that are displayed beside their names during your Live session.
To start earning these badges, set up a business or creator account, check your eligibility, and turn on Badges for your account. Currently, you should have more than 10k followers to use this feature and get paid.
If you already have 10k followers, engage your supporters and ask what they’d like to see in your live session, so they’re more invested in your content. When you’re Live, remind viewers you’ve turned on Badges and pin a comment with a badge goal on your chat, so they’re motivated to donate to you.
You’ll see a reminder whenever someone purchases a badge, or you hit a milestone, so don’t forget to thank them and give them a shoutout. This will help improve loyalty and also encourage others to support you.

2. Sell your products Live
Instagram’s Live rooms allow viewers to shop your products while they’re in a live session with you using the Live Shopping feature.
Think of this feature as an upgrade to the traditional shopping experience where your users can interact with you, and you can collaborate with brands to drive more sales.
For instance, if you’ve already set up an Instagram Shop, you can collaborate with influencers to show viewers how to style pieces from your store and tag a product from your Instagram shop catalog at the bottom of the screen so viewers can purchase your product without leaving the Instagram app.
Since you’ll interact in real-time with your audience, you’ll be able to address their objections better and convert them into paying customers more easily.
3. Boost your brand image
Instagram Live Rooms has a Fundraiser feature that allows you to collaborate with charities and raise funds for a cause. This helps people see the humane side of your brand, improves your brand image and reputation, and makes them more likely to purchase from you.
All you've got to do is set up your Live rooms like you normally would (more on this in the next section) and turn them into a Fundraiser.

Source: The Verge
Note: Use this feature to showcase yourself as a socially responsible brand only if you’re genuinely interested in the cause you’re supporting.
How to create Live Rooms in 3 steps
Step 1: Open your Instagram Stories camera and select the “Live” mode icon.

Source: The Later
Step 2: Next, add a title for your Instagram Live Room so your viewers know the topic of the Live Room and what they can expect from the session. To do this, simply click the “Left Aligned (Title)” icon on the left-hand side of the screen and enter the title.

Source: The Later
Step 3: Ensure your connection isn't spotty, and tap the "Live" icon to start your broadcast. You'll need to spend the first few minutes chit-chatting with your viewers, so viewers get enough time to join the broadcast.
Then, tap the "Video" icon and click the profiles of those you'd like to add to your room to send them requests and add them to your Live Room. Here, you'll also see people who have requested to go live with you.

Source: The Later
How to host a great Instagram live: Pro tips
Going Live on Instagram boosts your discoverability by getting you bumped to the front of your followers’ story feeds. But landing in front of your followers’ feeds isn’t enough to guarantee a session that gives you results that align with your business goals. That’s why we’ve added 10 IG Live tips you must follow to host a successful session.
Before going live
Going live on Instagram comes with its fair share of challenges. There might be snags, or you might talk about things that are off-topic and end up not providing enough value to your audience.
Both these situations aren’t very favorable, and unlike other video formats, you can’t tweak your video while you’re Live. So, we’ve listed a few tips that will ensure that you have a smooth run when you’re going live.
1. Decide the objective
Like every other strategic marketing move you make, your Instagram Live will perform better if you’re doing it with a purpose. Your goal could be anything from getting more followers to getting people to purchase your products or sign up for your services.
And even if it’s just a casual session, you must answer these two questions before planning your Livestream.
- How am I adding value to the customer’s life through this Livestream?
- What action do I want viewers to take after they’ve watched it?
Just take care to ensure the goals you set for your Livestream are SMART (Specific, Measurable, Attainable, and Time-Bound) so you have realistic expectations and don’t set yourself up for disappointment. Check out the table below to understand the concept of a SMART goal in detail.
|
Vague goal |
Specific goal |
Assessment |
|
|
Specific |
Do a good live stream |
Get 10% more streamers on the next live stream |
The first goal is vague, while the one on the right is more focused. |
|
Measurable |
Gain new followers |
Gain 100 followers |
You can check if you’ve gained 100 followers or not at the end of the stream. So, the second goal is measurable. |
|
Attainable |
I want my book to become a best-seller overnight through this stream |
Get at least 15 people to check out the new book I’m writing. |
Becoming an overnight sensation is unrealistic but getting a few people to check out your book is totally attainable so the second goal is attainable. |
|
Relevant |
I want 100 likes on the Live that’s promoting my book |
I want 10 shares and at least 10 people to check out my book after the stream |
Although likes are one of the most common metrics, measuring it will not give a clear indication of whether people are buying your book or not. |
|
Time-Bound |
I want to hit 1k followers on my IG page |
I want to hit 1k followers on my IG page by the end of this quarter. |
Having a time-bound goal helps you focus and create a strategy that’ll help you achieve the goal within that time span. |
2. Choose a topic and create an outline
We know this tip sounds counterintuitive and goes against being natural and laidback, but hear us out. When you’re going Live for the first few times, having a topic and a blueprint will help you hold the audience’s attention for longer. It will also ensure that your message is delivered effectively and your audience can get value out of it.
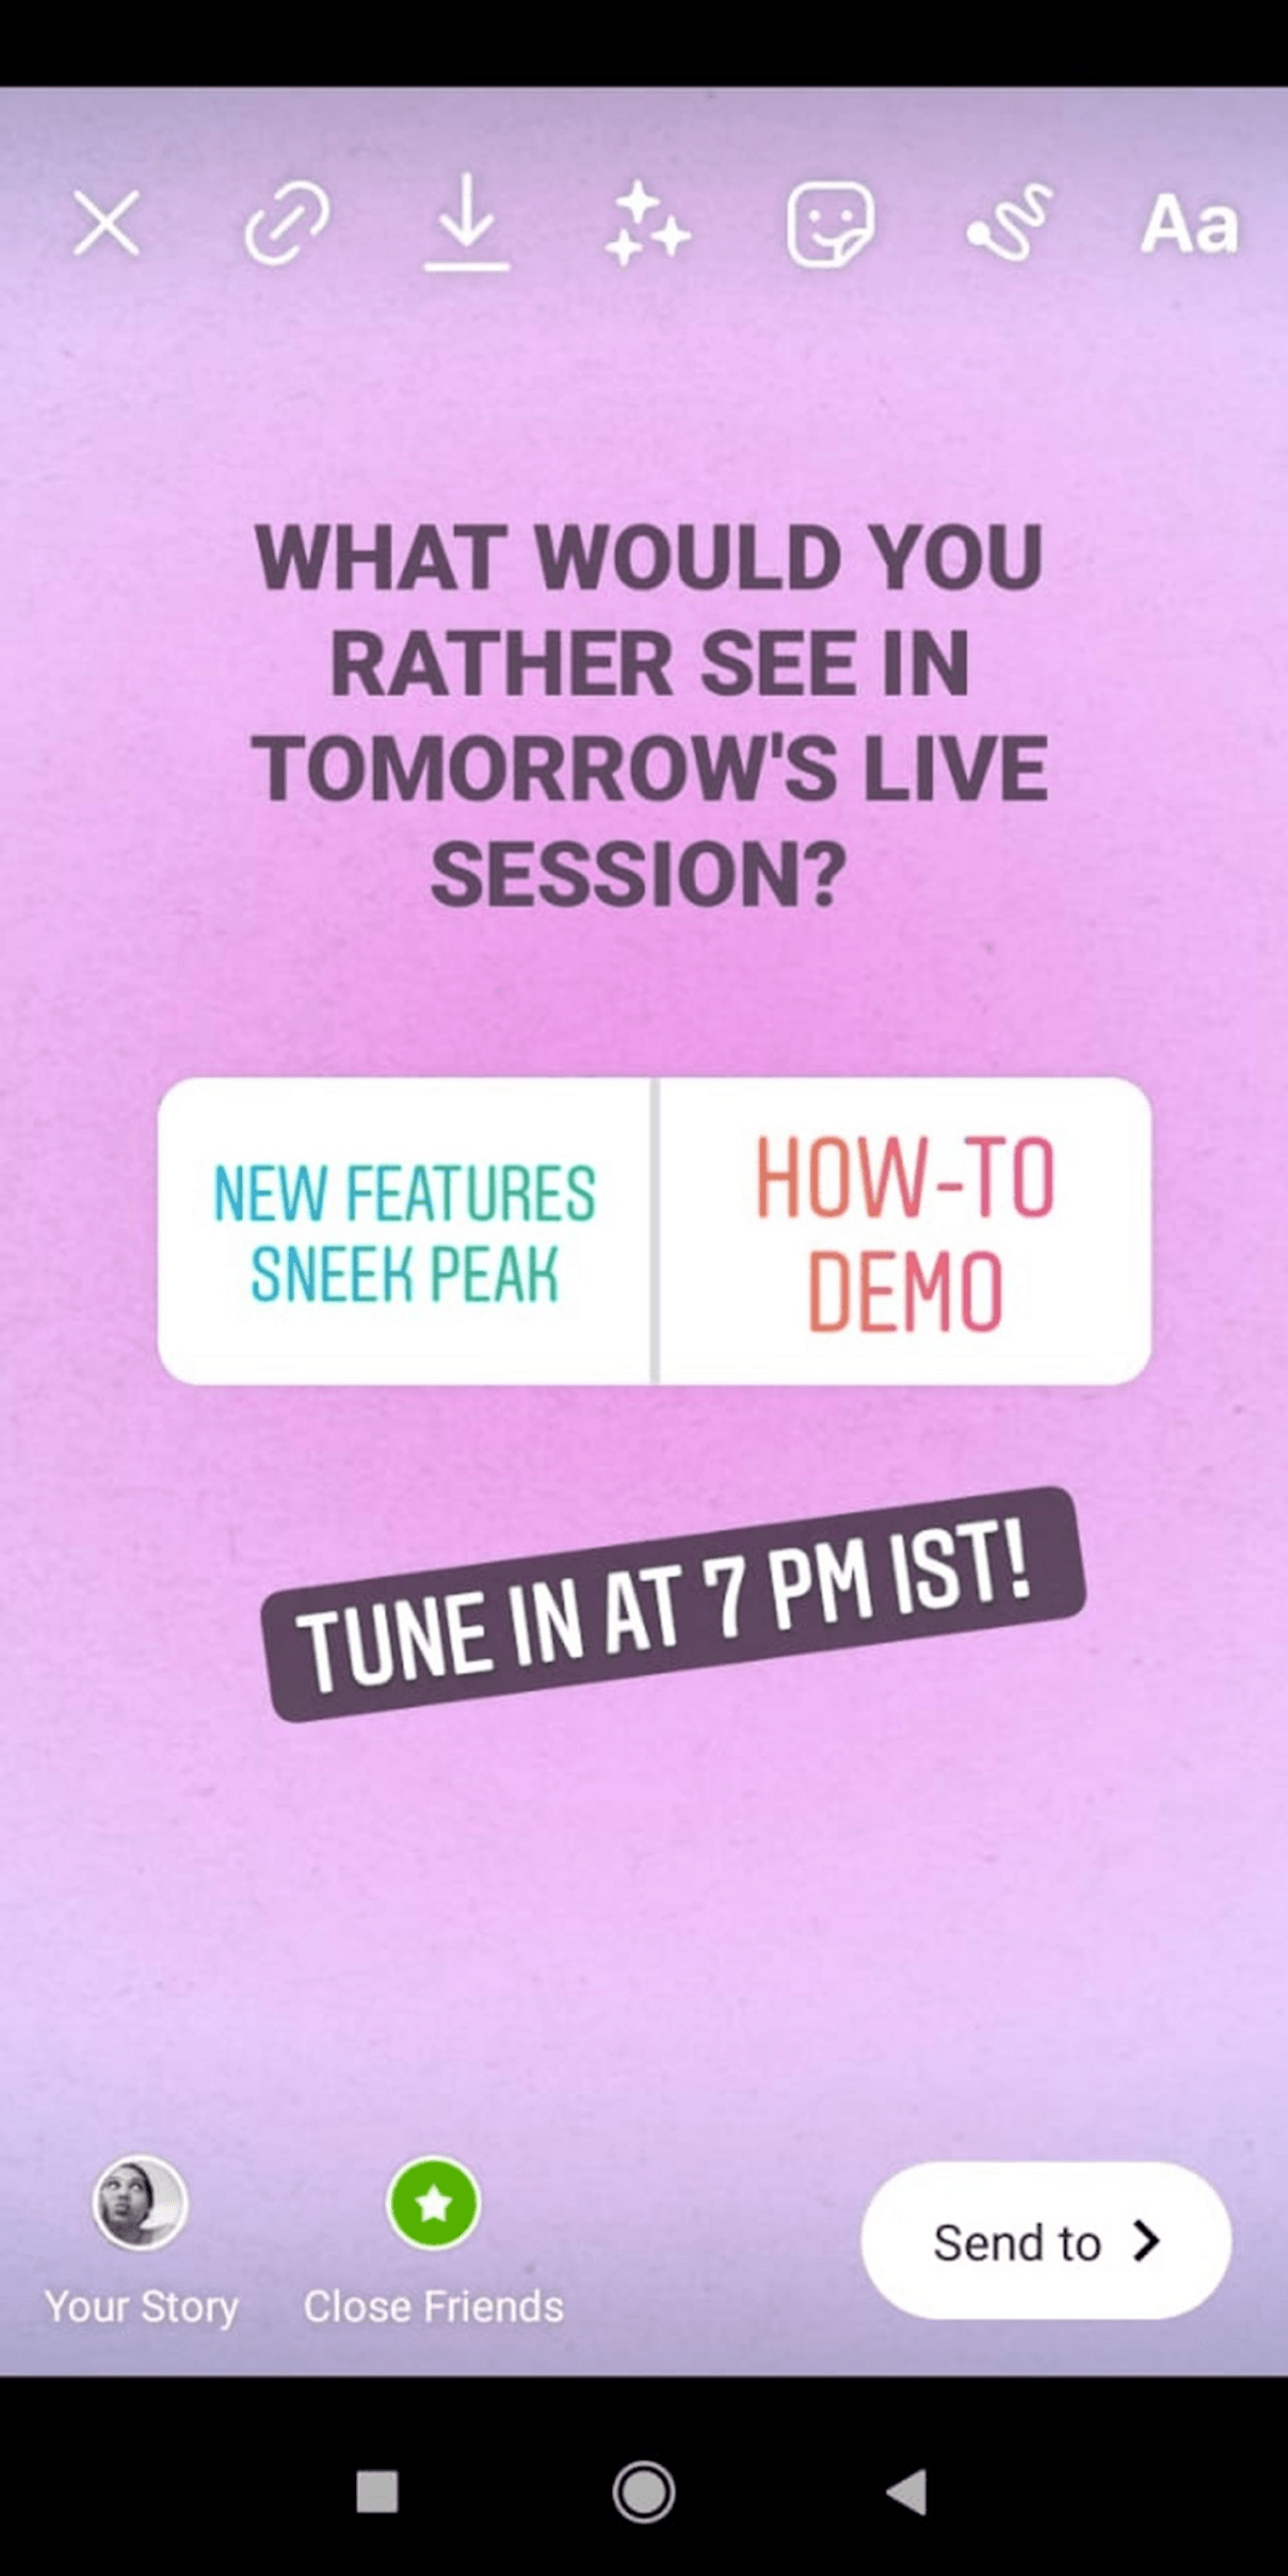
So, you need to come up with a topic or theme for your Live and create an outline to create a focused and value-packed session for your audience. And you don’t have to go overboard with this. All you’ve got to do is use Instagram Polls or Question Stickers to ask your followers what they want you to talk about. Posting a story with a simple sticker like Women's Health UK will also do the trick.
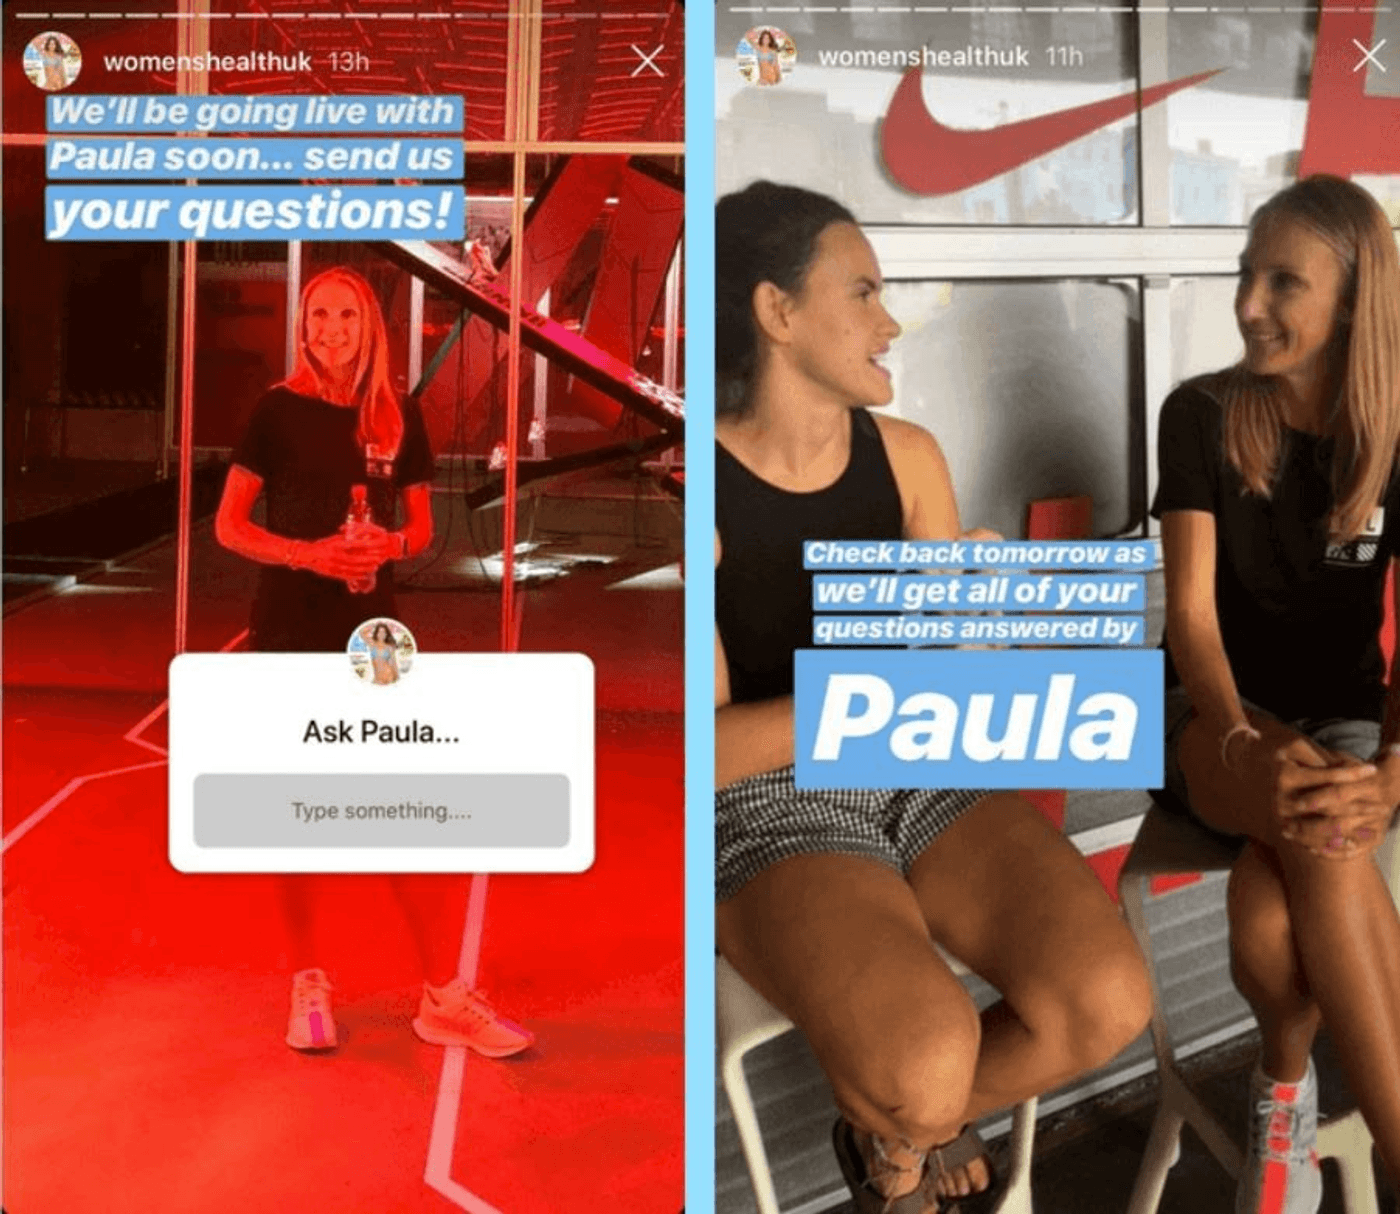
If you don't know which topic to choose, simply post a poll and let the audience do the picking for you. Here's an example:
As for the outline, you can pick a few questions from your stickers and prepare a few points to answer them or structure your session like this:
1. Introduction: Outline the value your audience will receive from the Live and tell them why they should stay till the end.
2. Body: Give a few actionable tips that’ll add immense value to your audience
3. Conclusion: Recap the session, reiterate the value, and add a CTA (more on this later.)
3. Promote your live
Having a steady stream of promotions for the session on your Stories and profile will ensure that your audiences are prepared for what’s to come, and it’ll give them enough time to pencil in your Instagram Live session into their schedule.

A great way to promote your live session is with video teasers using Instagram Reels, posts, and stories, made with a simple video editor like InVideo.
A teaser is a tried and tested mechanism that never fails to capture your viewer’s attention. You can take video snippets from your live videos and show the results of using your product or simply give a quick glimpse of your product to create a product teaser as Fenty Beauty did.

You can easily transform your IG Live videos into product teasers using InVideo templates. All you’ve got to do is choose a template like the one below, add snippets from your Live, and add a CTA asking people to check out your products.
Pro-Tip: You can also promote your live streams by using a countdown sticker in your Instagram stories, so people remember to tune into it.
4. Test before you go live
If you’ve done an Instagram Live before, then you know you can run into lighting problems, connection issues, and technical snags while you’re Live.
Instagram’s practice feature allows you to bypass these issues and create a smooth stream by going Live ahead of schedule and checking for lighting and other technical issues.
If you’re facing a lighting problem, then invest in a ring light or seat yourself in a spot with soft light, so you don’t end up with harsh shadows or low visibility on your Live. Here’s a spot you can use to ensure that your face appears well-lit. And if you’re facing an issue with the broadcasting, check your internet connection and make sure you’re adhering to the minimum bandwidth for streaming.
Once you’ve got all the issues out of the way, practice what you’re going to say with the Instagram Practice feature. Check for parameters like enunciation, inflection, and delivery speed, and experiment with a joke or a funny story to keep your audience hooked. Here’s how to start Instagram Live’s Practice Rooms feature:
Step 1: Open the Instagram app and select the ‘+’ icon and choose the Live option.

Step 2: Tap the Live icon, select the eye on the left side, and select Practice audience.

Step 3: Tap the Live icon again, and Instagram will take you live on a practice session after checking your connection.

Step 4: You can also add more people by tapping the people icon in your stream.

During the live
Now that you’re all set to go Live on Instagram, let’s take a look at what you should be doing during the Live to have a successful session.
5. Go live when your audience is most active
Going live when your audience is active on Instagram is one of the best ways to ensure your Instagram Live reaches the maximum number of people online. So, take a look at the Audience Tab under your Insights section to find a breakdown of when your followers are most active online, broken down by day of the week and time of day.
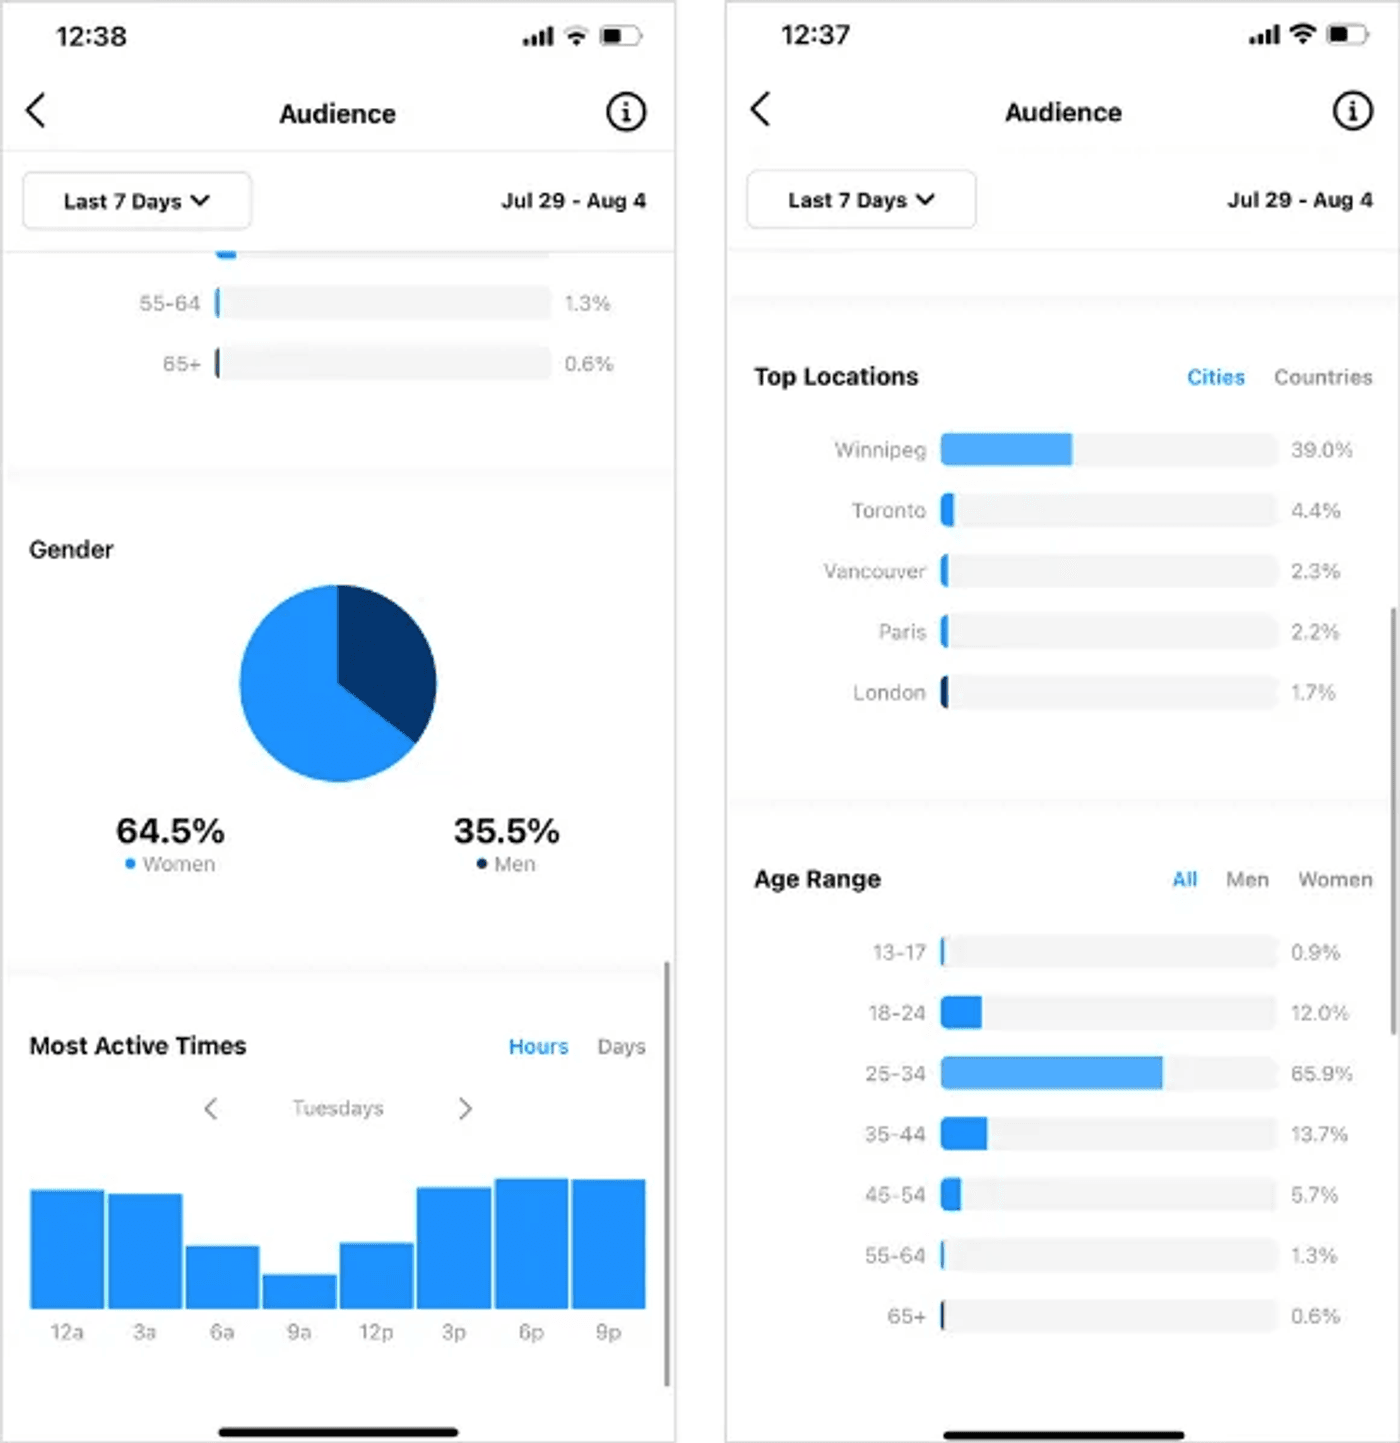
If you’re just starting out and don’t have enough insights into when to post on Instagram, then take a look at this blog to get a rough idea on the best times to post on Instagram.
6. Engage with your viewers
The whole point of going Live is to have real-time interaction with your audience. So encourage them to engage with you during your Instagram Live with gestures like greeting those who join in early and asking about or after them, reading out interesting comments, and interacting with them by addressing them with their first name.
As you’re going on with your Livestream, make sure to keep a close eye on what’s going on in the comments and acknowledge any questions or concerns from your viewers.
Aslo, remember — this is all happening in real-time, so be mentally prepared to improvise.
If a viewer has left a great comment or has asked an engaging question that may start a conversation and increase interaction with others on the live video — don’t forget to pin it.
Since a pinned comment becomes the first one people see and read, you can also pin your own comment giving your audience information about the live, redirecting them to links, or giving them cues to interact with you. Here’s how you can pin a comment on Instagram Live:
7. Consider video length
When it comes to live streaming, there’s no such thing as a good and bad video length. However, here are a few tips that’ll help you decide the perfect live length for your video and make the most out of it.
- Experiment with different video lengths
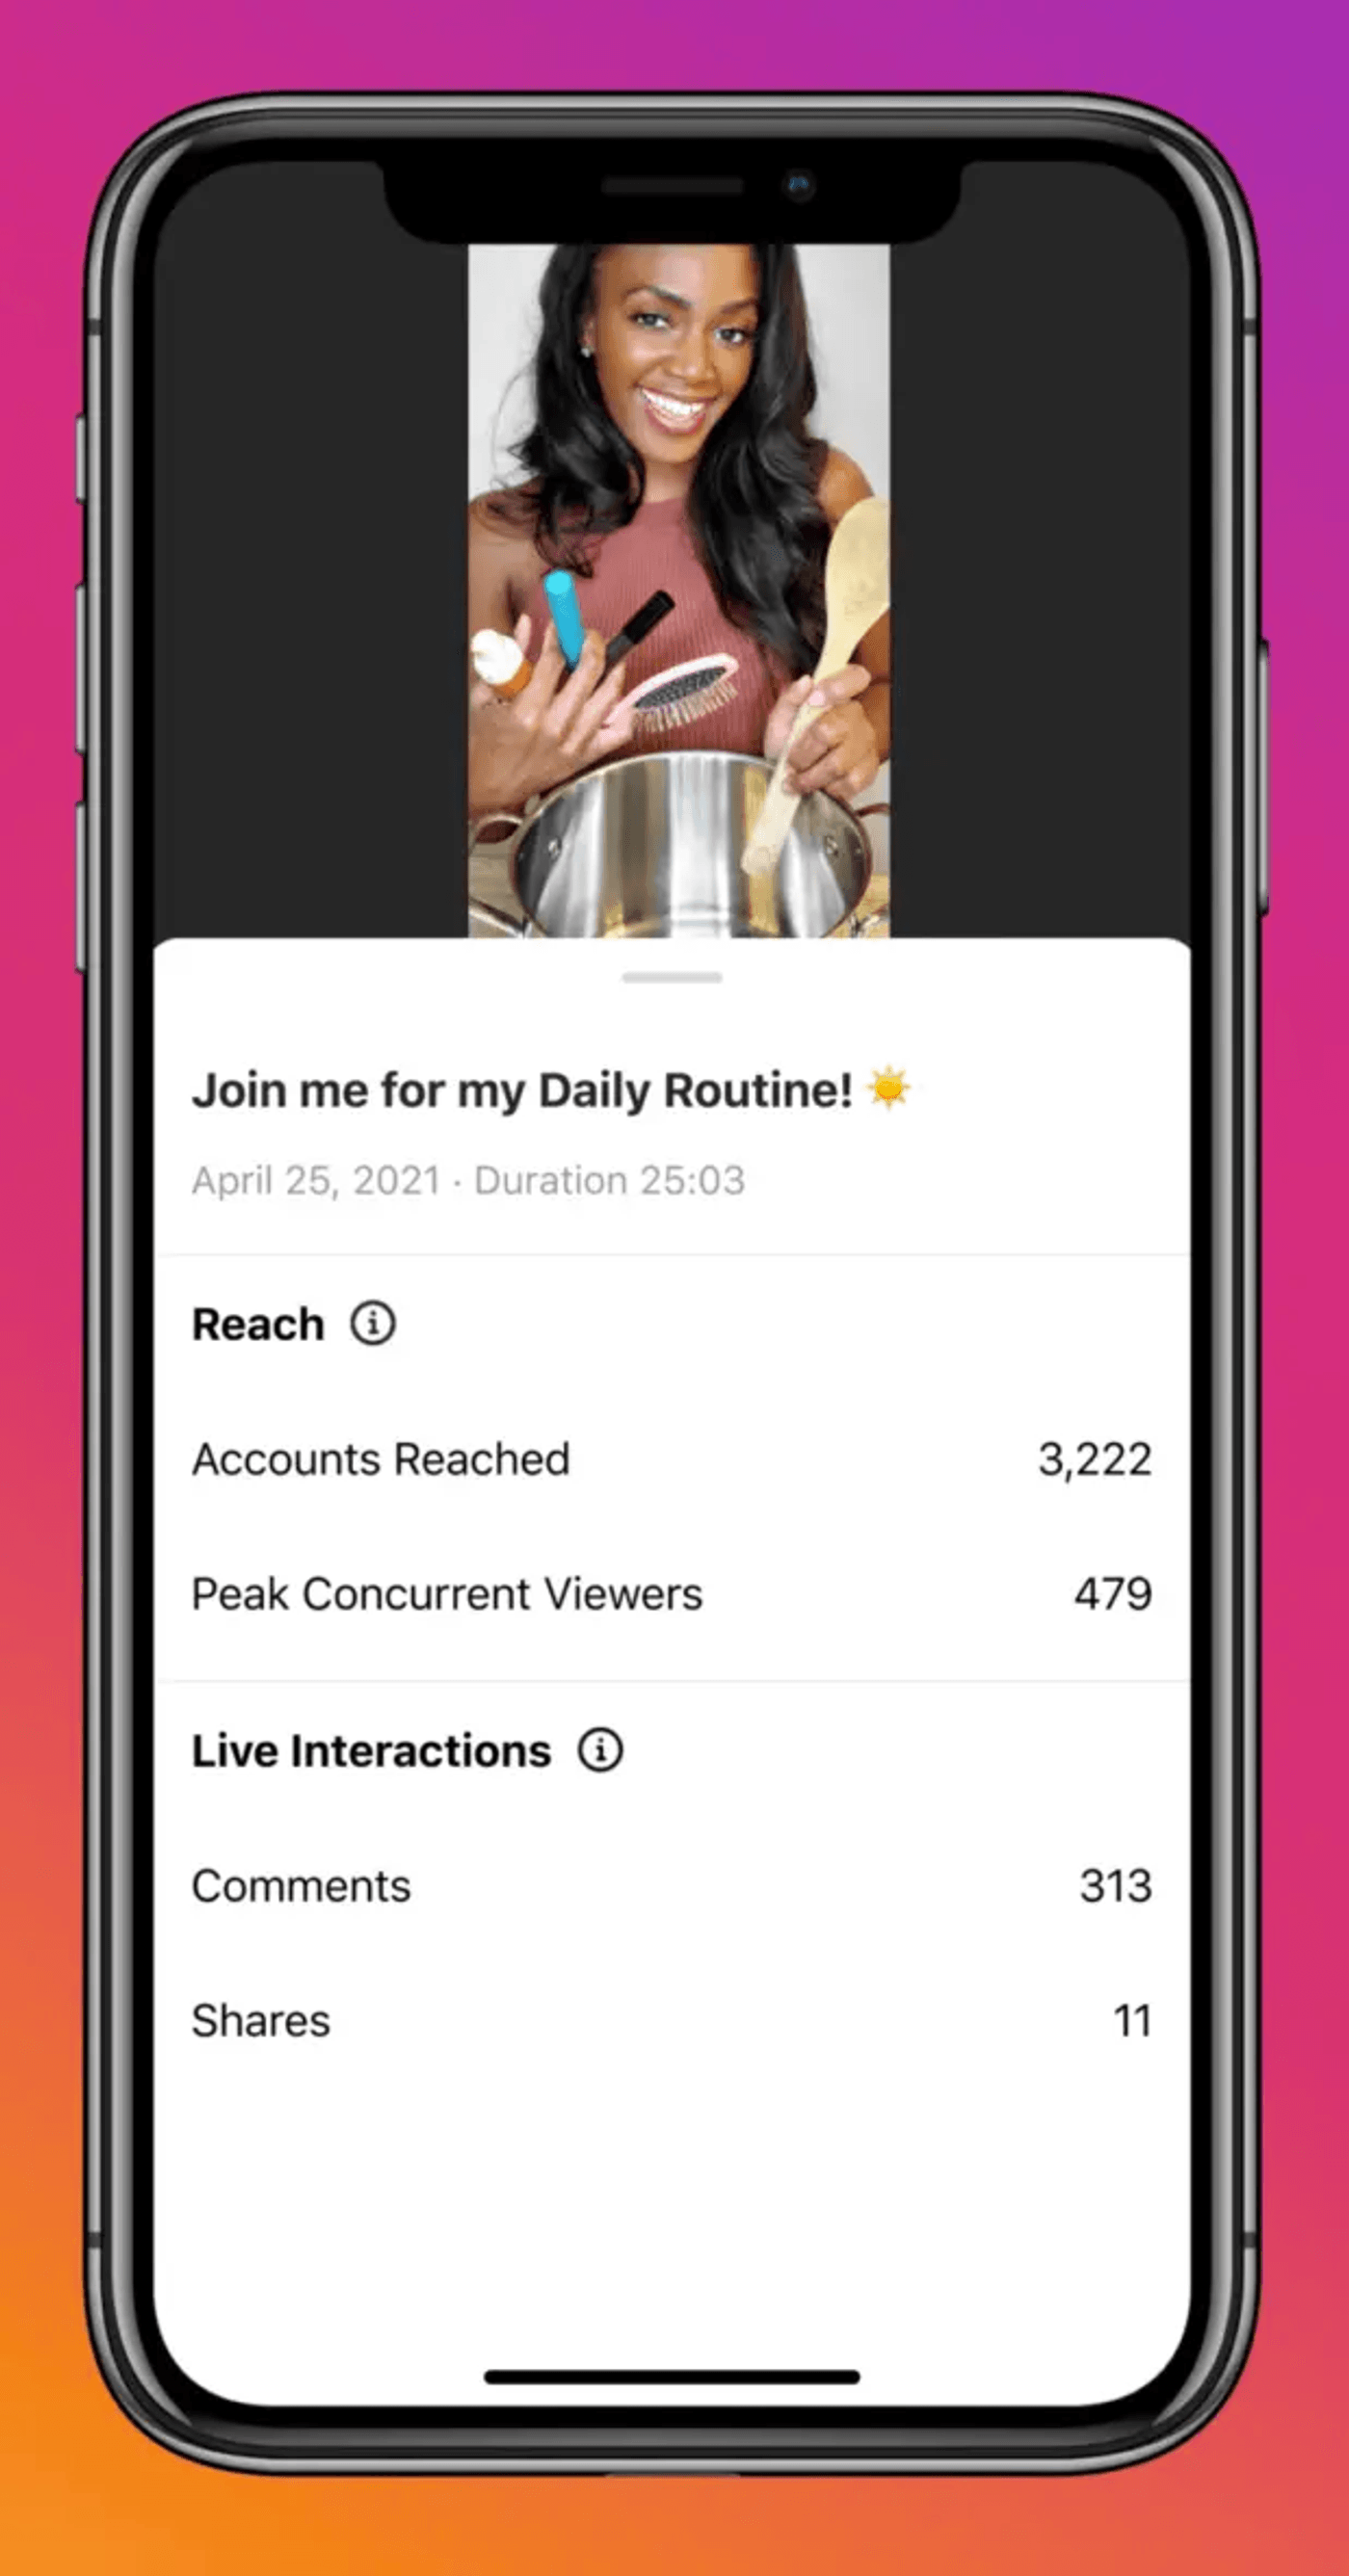
Instagram’s Analytics gives you important insights into how your live stream performed. You can see the number of people reached through your stream, new followers, comments, and live shares.
To arrive at an ideal length for your page, experiment with different video lengths and check out the Instagram Insights after each stream to see how each video length affects your metrics.
- Consider content type
The content type is very crucial when it comes to deciding your video length. If you’re filming a simple Behind-The-Scenes video, you can end the live stream in a few minutes. But if you’re conducting a live exercise or workout session or hosting a live event, then you can stream the video for a longer time.
- Gauge the audience’s awareness
If your audience isn't very aware of your brand or its services, you'll have to spend longer time on your streams to build a rapport and connect with your target audience. But if your target audience is already familiar with your page, you can do shorter streams and provide more context through pinned comments for new users.
You can also check out this in-depth guide on Instagram video lengths to get a better insight into this topic.
8. End your live with a CTA
When people join your live it is usually to see what you’re up to or learn something from you — this means that they are invested in you and your content.
You must use this opportunity to redirect them by giving them a call to action. You can ask them to sign up for your weekly newsletter, follow you on Instagram for daily updates, sign up for your course or buy a product you recommend or sell. Keep it simple. See how Bon Appetit Mag does it:
After the live
Here are a few tips to make the most of Instagram Lives even after the session has ended.
9. Take a look at your Instagram analytics
Once your stream has ended, take a look at Instagram Insights to understand what types of content perform well with your audience and modify your content plan accordingly.
This also helps you save time and resources on guesswork and helps you provide more personalized and valuable content for your target audience. Here is a list of Insights Instagram offers for Live sessions:
Source: Hootsuite
10. Repurpose Your Content
Repurposing your content helps you replicate your success, improve your reach and multiply your results with very little effort. Since it’s not possible to talk about all the types of content you can create from a single live session, we’ve added an entire section to cover this in detail.
How to repurpose your ig live content [post-livestream]
The simplest way to repurpose your Live would be to share your Instagram Live in its current form across all your social and marketing channels. This includes platforms like Facebook and YouTube, as well as embeds in blog posts, newsletters, and mailers.
But if you’d really like to get your money’s worth, we’d recommend divvying up your full live stream into snackable formats that are short and sweet, engaging, and high on value for the viewer. These snackable videos should ideally be between a minute to two minutes long.
We’ve put together a few ideas and tips for you:
1. Make a video quote
A very convenient idea for a snackable video is to pick an important quote and make a small snippet and post the video on Instagram. InVideo has 90+ ready-to-use quotes templates for you to choose from for exactly this purpose.
At InVideo, we shot a live video with Kim Garst, and we turned one of her quotes into a snackable video for our Instagram:
2. Create a snackable video
You can pick up an interesting insight from your main content and post a short video around it to generate buzz.
We took out some great snippets from a live stream we’d conducted and turned them into snackable videos that give small doses of information — giving people a peek into what the live discussion was like.
3. Transform your Live Stream into ads
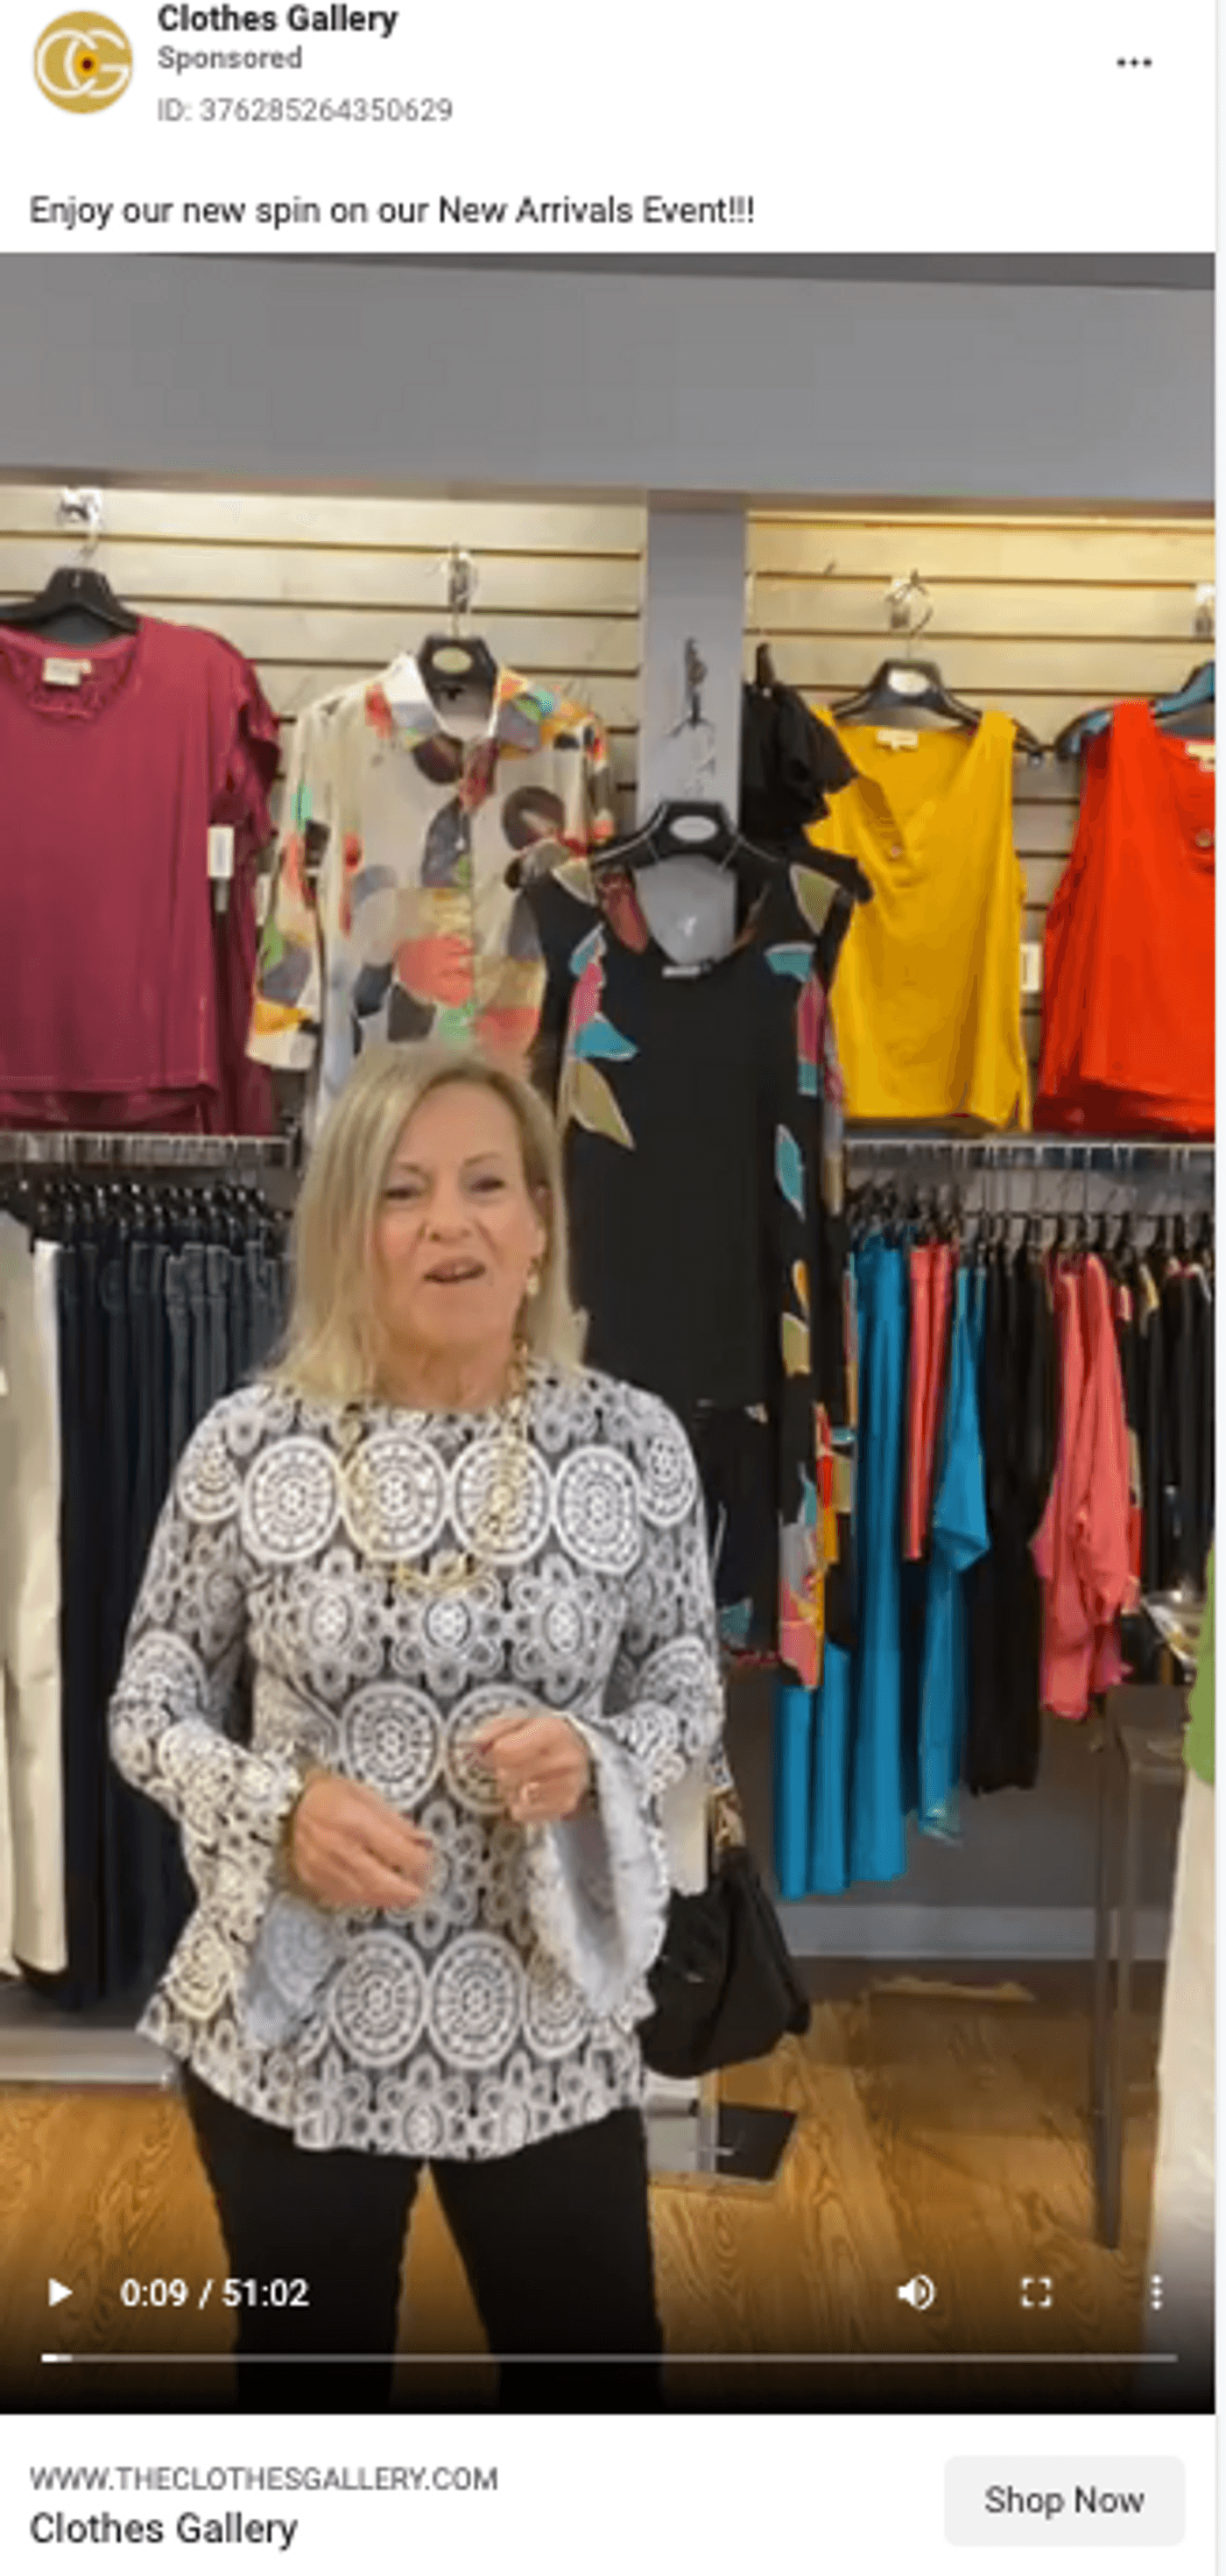
You can download your live streams and run them as ads on Instagram and Facebook, so more people are aware of your products and buy them. Here's an example of a Live from the Clothes Gallery in which Shirley, the store owner, takes us through the new arrivals in her store. She and her colleagues detail the material the clothes are made from and also talk about the occasions you can wear the dress for.
The detailed explanation and demonstration convince potential shoppers about the quality and push them to visit the store to check out the clothes.
The shop has created a lengthy ad out of a single live-stream session in the example above. But you can convert them into snippets for each product and convert them into Facebook or Instagram ads to make sure each product gets enough exposure and reaches enough people.
4. Turn your Livestream into a Podcast
Turn the Livestream content into a podcast and distribute it across audio platforms.
Every leading media publication is now venturing into podcasts where they take their major video stories and turn them into interesting podcasts. For example, leading publication Vox runs The Weeds Podcast on politics and policy, where they discuss topics that they have covered throughout the week in print and digital media.
Pro-Tip: To get more people to tune in to your podcast, create a promotional video using the InVideo template given below:
5. Create a series out of a Livestream
You can create an entire series out of a single Instagram Live if it involves giving advice to your Insta viewers or answering their questions.
Each tip or actionable piece of advice can be its own video, and you can direct them to go back to the Livestream for the full lowdown or more such tips, like in the example below.
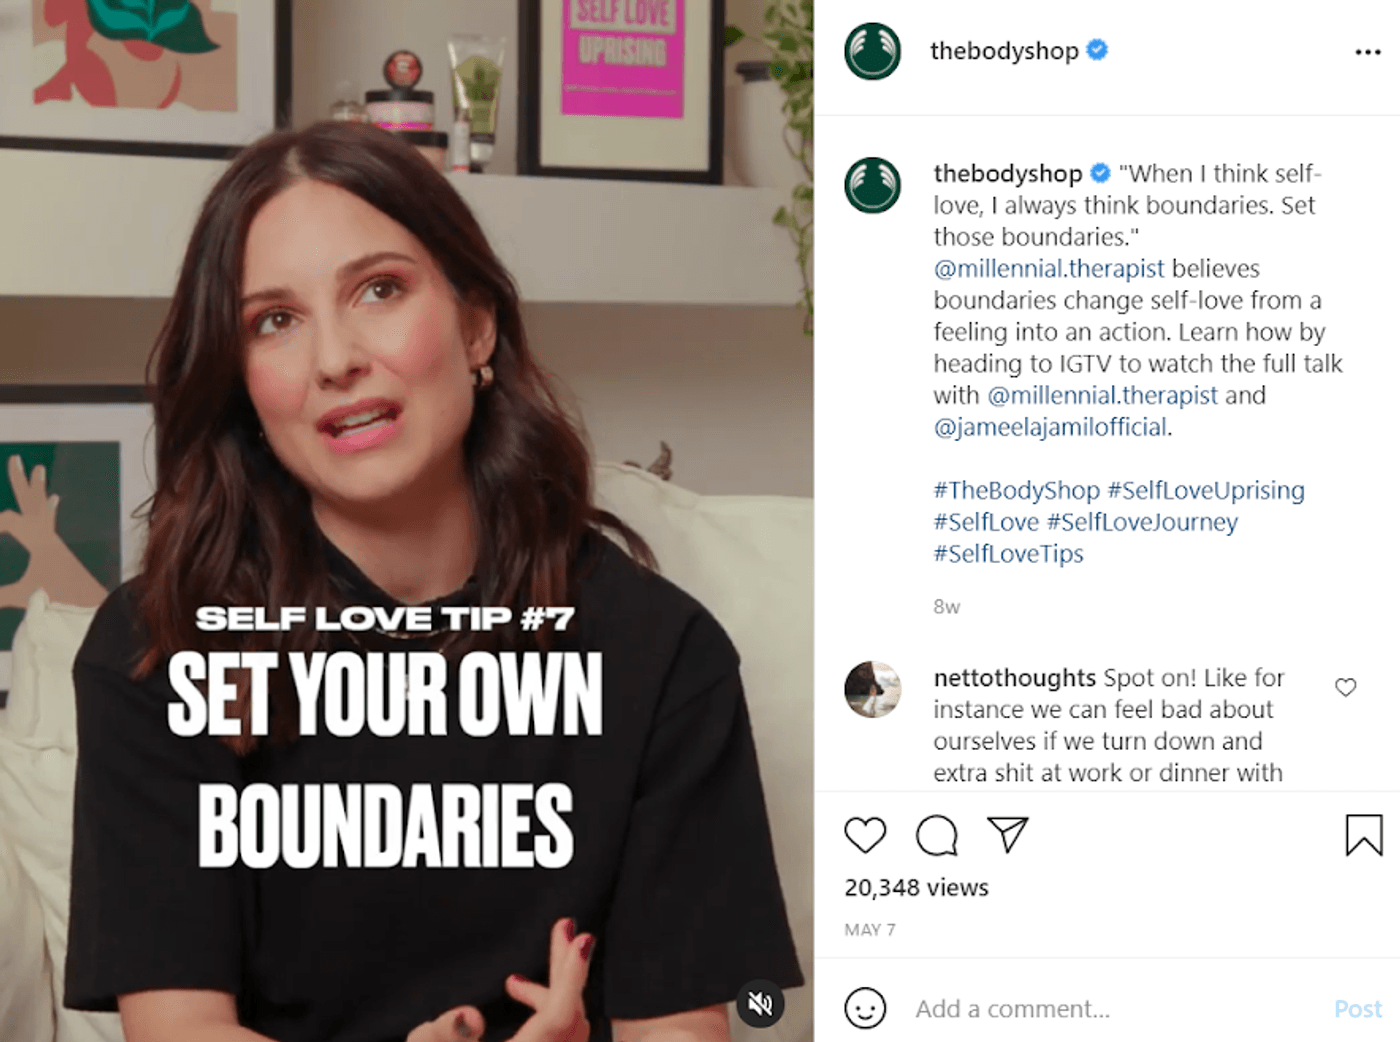
This also works really well if you have an expert or other voice from your industry or field at your session. To create anticipation for your upcoming series, make a short promotional video by modifying the InVideo template given below:
6. Turn customer interactions into reviews
Say you had a customer join you during your live chat, and they gave a glowing review of your business.
Go ahead and pull this bit out and put it on your socials as a video testimonial. Make sure to add their details and use key descriptors they may have used to highlight the words they associate with your product or service.

How to repurpose your Instagram Live using InVideo
In this section, we’re going to learn how to create a quotes video we mentioned in the previous section using InVideo.
Step 1: Go to InVideo’s Instagram Video Editor and select the desired aspect ratio to launch the editor. We’ve chosen a 1:1 aspect ratio as we’ll be posting the video on our Instagram feed.
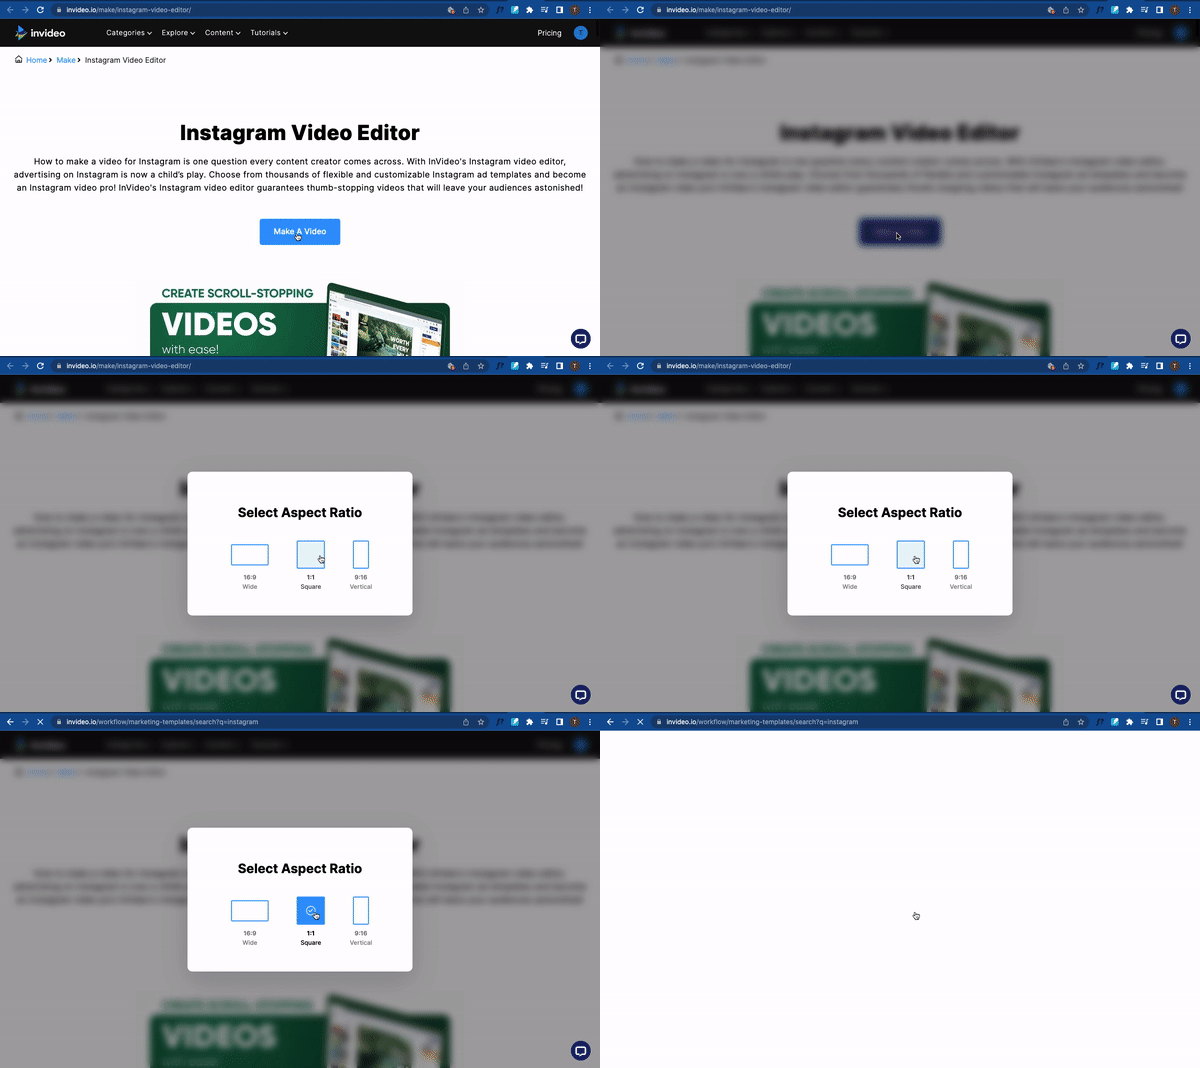
Step 2: Use the search bar to find the template you desire and select the desired template by clicking Use This Template.

Step 3: Once the template has loaded, edit the text by double-clicking on it.
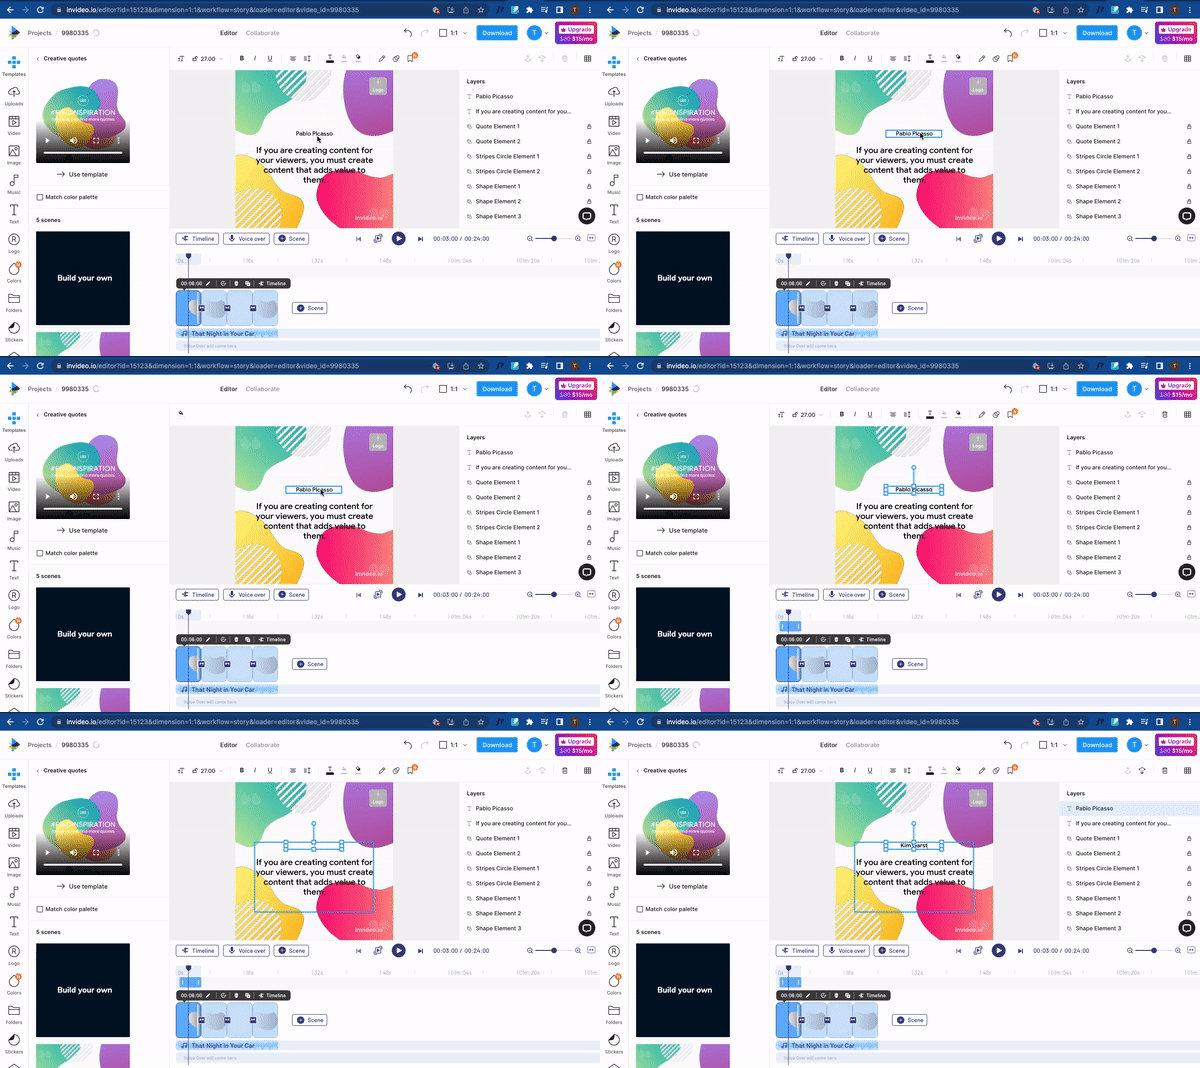
Step 4: Next, click the Upload Logo button to upload your logo. This logo will be added to all the scenes in the video.

Step 5: Next, click the Upload Media button, select the media you’d like to upload and drag, and drop it into the canvas to upload it. We’re uploading a picture of Kim to add to our quote.
Once you’ve uploaded the image, you can bring it to the front by rearranging its position in the Layers panel.
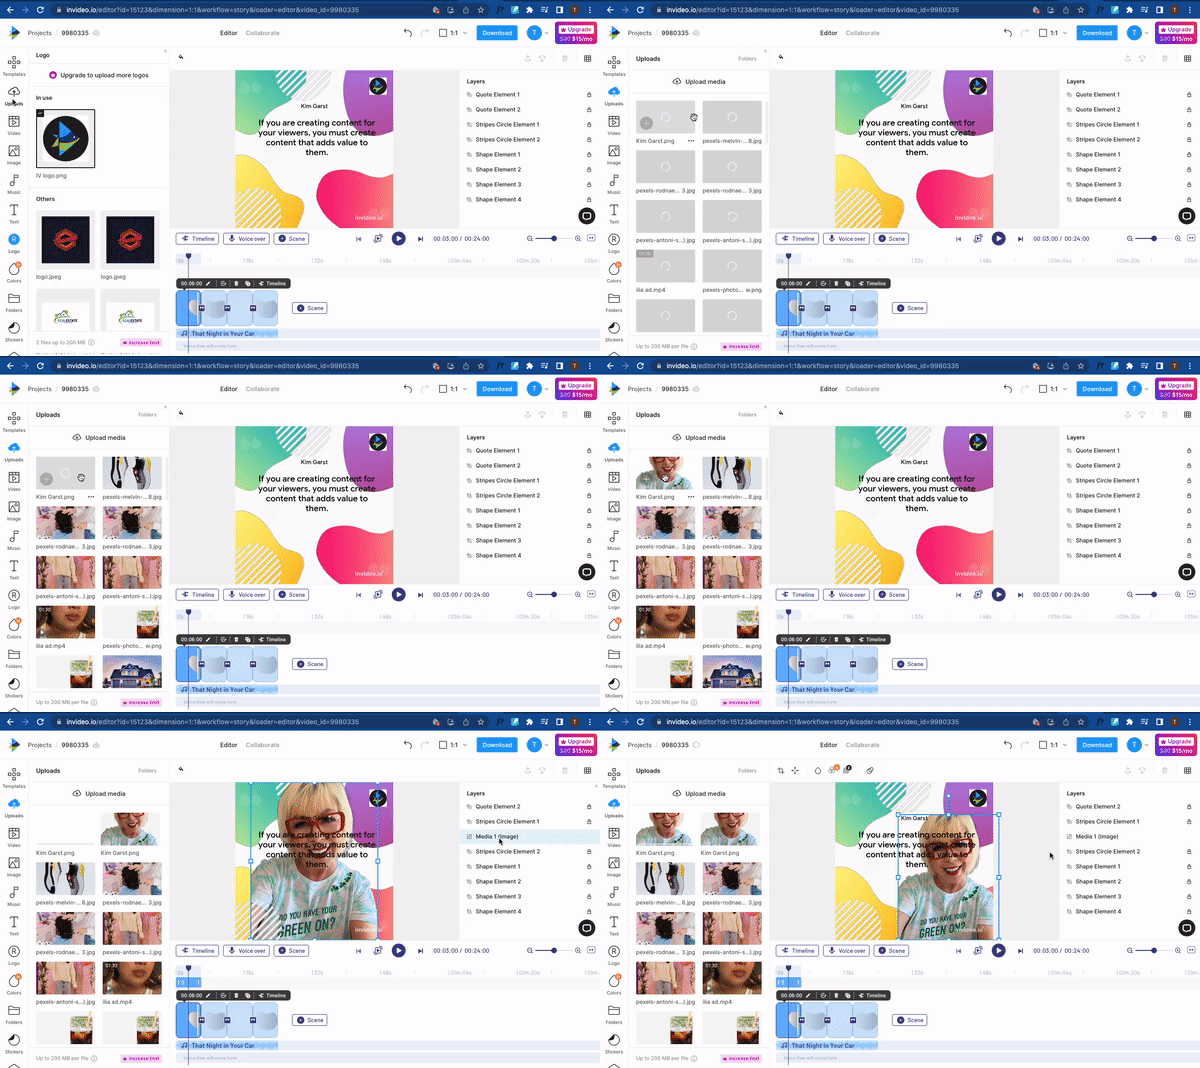
Step 6: Next, replace the music track by clicking the Music tab, selecting a track, and choosing Replace Music.

Step 7: When you’re satisfied with the edits, click Download and Share to import the video.

Now that we’ve looked at tips to host an engaging Live session that adds value to your audience and how you can repurpose it to keep churning out content let’s take a look at some proven ideas for your IG live that’ll get you new followers and leads.
10 IG Live ideas to get you started
If you’re feeling stuck or want to try something unique, here are 10 Instagram Live ideas to get your creative juices flowing and get more business from Instagram.
1. Industry lowdown
You could use your session for a round of Q&A and answer your viewers’ burning questions to do with your industry. Here’s how realtor Salerno does it:
Alternatively, you could discuss new developments in your industry and host workshops and live webinars to decode specific issues, especially if you’re in a very technical or complex industry.
2. Behind-The-Scenes Video
A Livestream can be a great way to take your audience behind the scenes and show them the realities of how processes unfold in your business. Depicting the ins and outs of your brand makes it easier for followers to identify with your brand, a key aspect in the digital marketing world today.
For example, viewers had the chance to visit the set of the TV show Brooklyn Nine-Nine in this Instagram live video through a virtual tour:
3. Product launches or demos
These are classic formats that can help you drum up some hype as a product launch approaches.
But IG Live is just as great to show off your product in action. 84% of people have been convinced to buy a product or service by watching a brand’s video, according to a Wyzowl report.
For example, Ben West (founder of Spark Grills) hosted a product demo of his company’s grill via a virtual cookout and chat.
Viewers had the chance to ask questions during the session, really getting their money’s worth. Notice that the Livestream wasn’t just about spotlighting the grill. There were other items also on the agenda, including the Q/A and his insight on consumer behavior in the pandemic.
You can turn the Q&A into smaller videos to post on your IG feed. Here are some Instagram templates you can use to do that.
4. Conduct a live sale
Taking the previous step further, you could hold a special live sale in case you have extra inventory that needs to be sold off quickly. Show how your products work, talk about their benefits and giveaway discounts and answer potential shoppers' questions on your Live, so they start purchasing your products within the Live Session itself. Here's an example of a live sale from bagsnob.
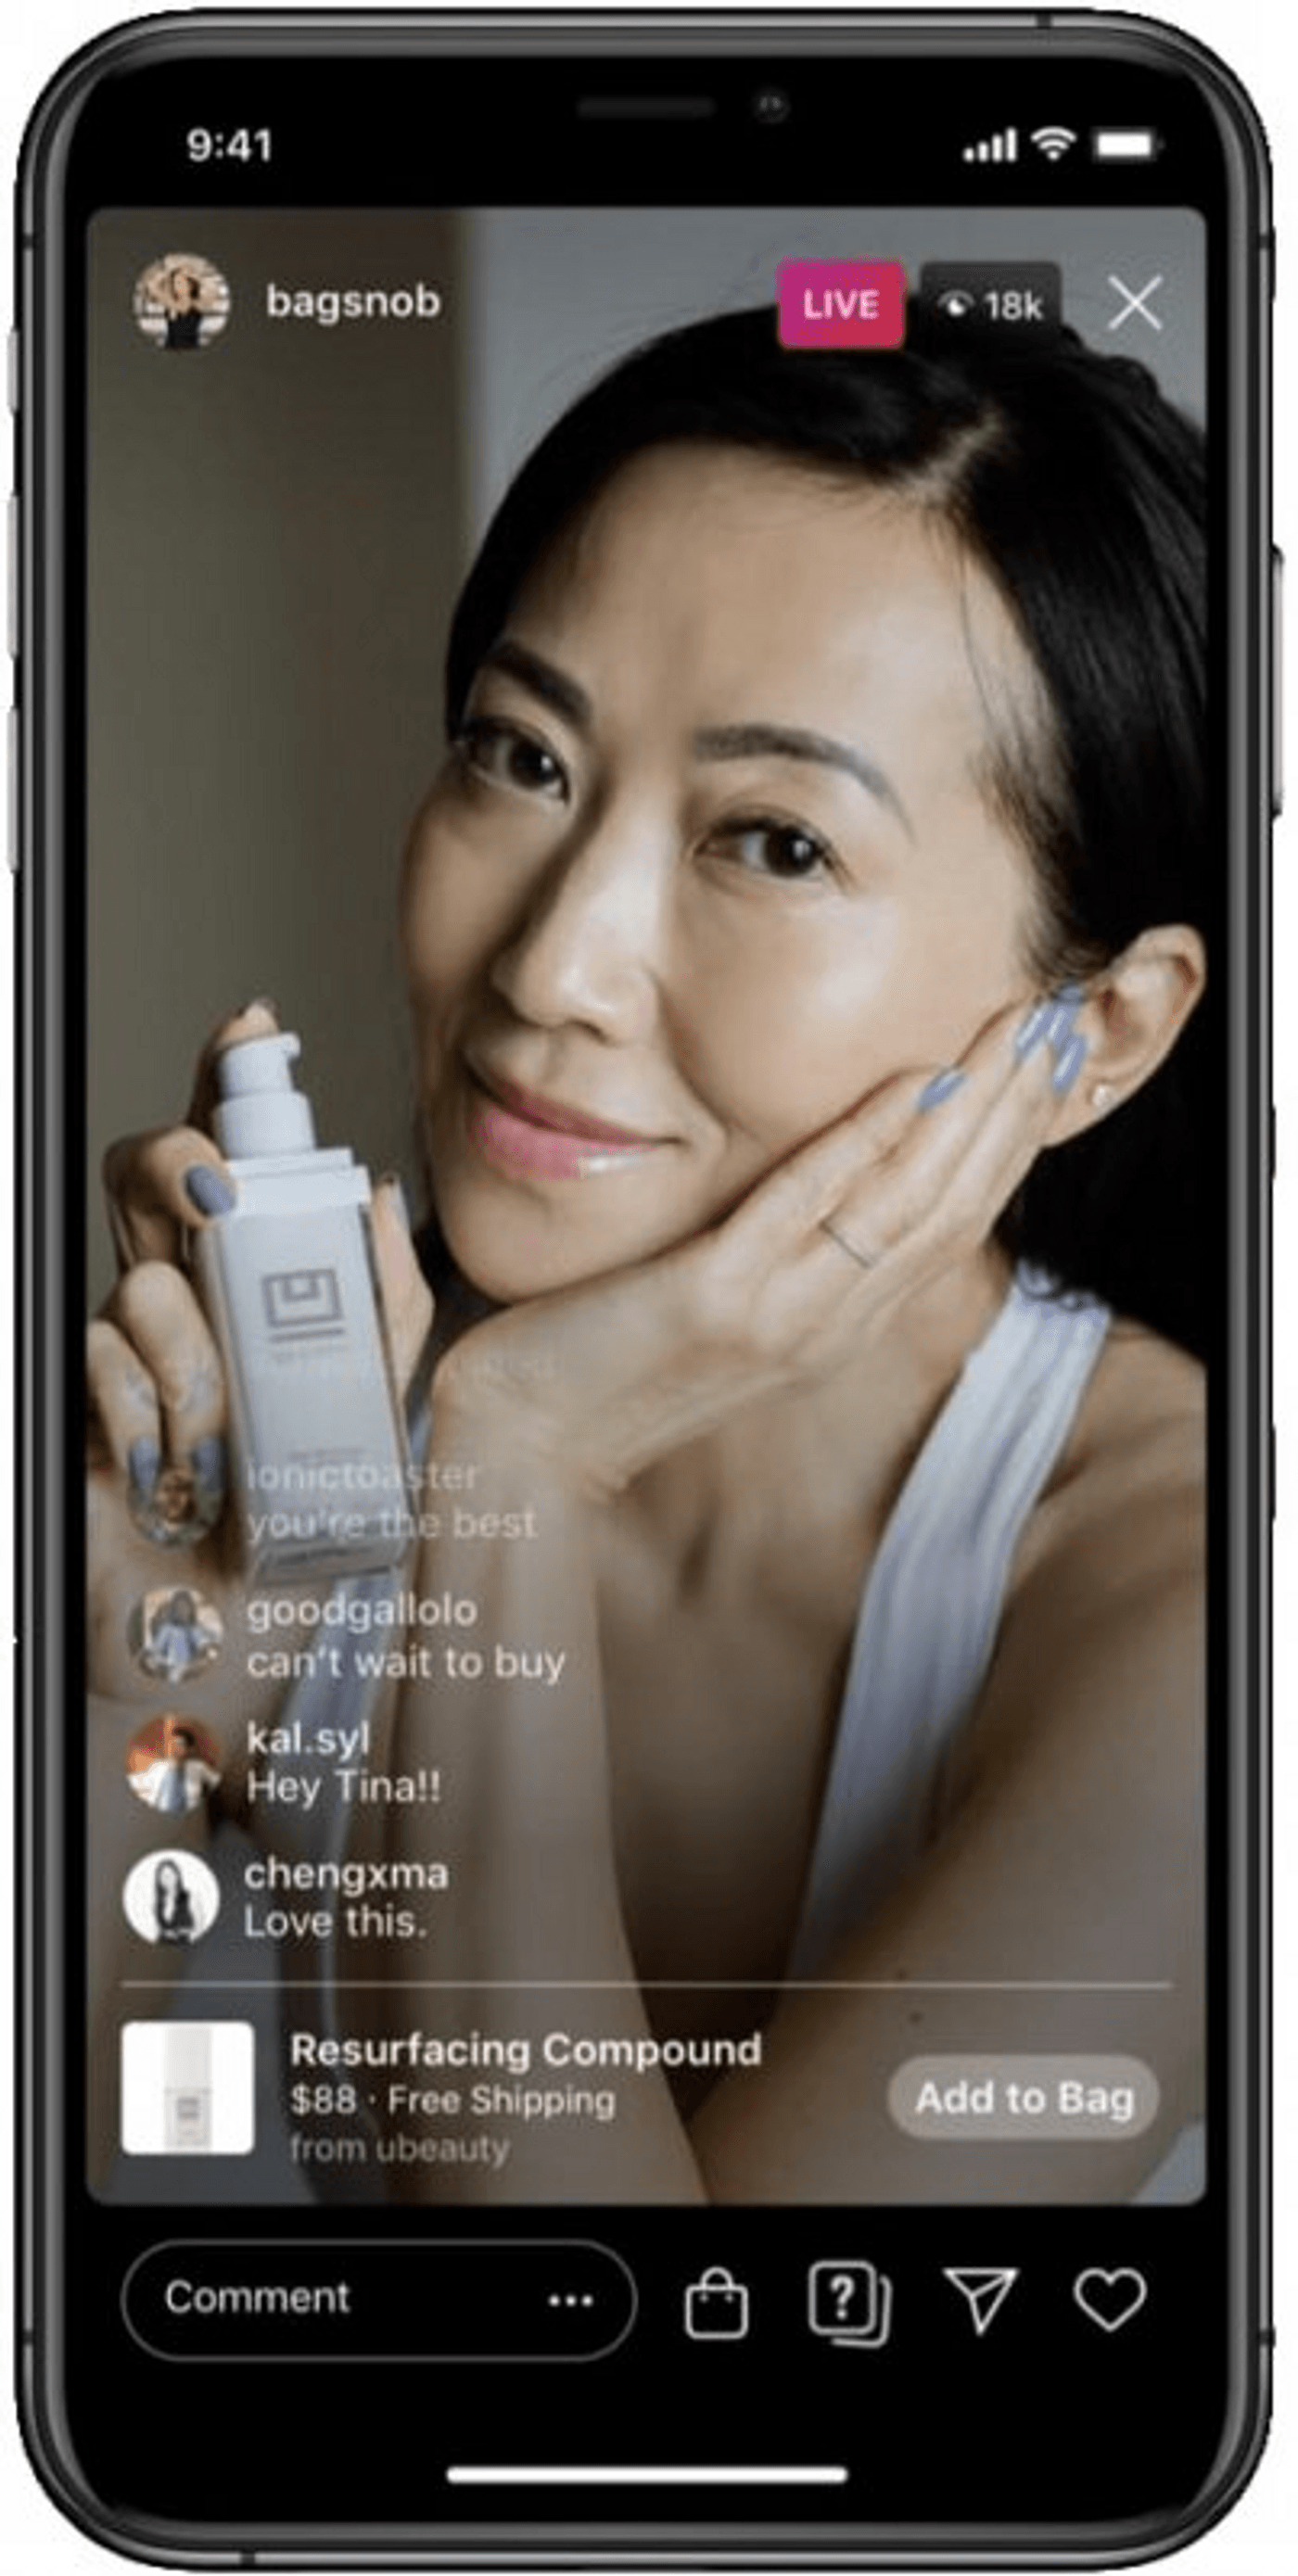
To create more hype for your sale or product launch, you can also add a reminder for sale in your story like Adidas does.

Pro-Tip: Use InVideo’s promotional templates to create a teaser video for your sale or product launch. Here’s an example of a template you can use.
5. Weekly segment
You could also host a recurring session with your followers at fixed intervals, such as on a weekly basis. This will let your followers know that they can look forward to a new broadcast from you on the regular.
Business strategist Jasmine Star, for instance, does a weekly segment where her followers (mostly business owners) can ask questions to do with how to market their business and build a brand, and she answers them:
6. Hype up your event
Events are one of the best ways to sell your products and services as they help reach a targeted audience, build a connection with them, increase brand exposure and help build your credibility.
But to make the most of events or webinars, you’ll need to ensure that you get as many people as you can to attend them. And one of the best ways to create hype around an event is to go live and get the speakers to interact with the audience and tell them exactly how the event will benefit them and what they’ll be missing out on if they don’t attend it.
For example, check out how Russell Brunson is promoting his eComm vs. Expert smackdown on his Instagram Live. He teams with Laura, the speaker, who explains why their event is different and the exclusive benefits they’ll get if they sign up for their event. They create a sense of urgency and exclusivity through the live, which makes viewers more likely to enquire about the event and sign up for it.
7. Create an unboxing video
People are hooked to unboxing videos because it helps them experience the product for the first time and evaluate it without actually buying it.
From a content marketing perspective, these videos are non-salesy and help build your credibility as a creator. And doing a live unboxing video only adds to the excitement of experiencing the product and multiplies your engagement as it’s done in real-time.
For instance, take a look at this unboxing video of a Red Komodo camera by Marques Brownlee. He answers questions from his viewers, explains how the product works, and where he’ll use it to give them a clear picture of how the camera will benefit them.
8. Share educational content
Providing value through educational content is the best way to build credibility, get potential clients to trust your brand, and reduce their hesitation of buying from you.
And going live to share your insights helps you have a two-way conversation with your audience in real-time, create a sense of FOMO and urgency, and convince them to buy from you.
Here’s how Kiana Danyal, a financial coach, does it with her live session. She talks about how viewers can change their money mindset and make their first $1 million online. She answers viewers’ questions, handles their objections, and promotes her 5-day live event as a part of her live so it seems like the best step forward for anyone wanting to make money.
9. Interview people in your industry
Interviewing people in your industry helps you tap into their audience and makes you the go-to person for authentic news related to the industry. Doing a live interview means you can also incorporate the viewers’ questions, improve your reach, and build a better connection with them.
For example, take a look at how popular media personality Lily Singh leveraged this concept in her live interview with indie filmmaker Oge Egbuono. She asks insightful questions to highlight the efforts that went into creating the documentary so more people can get educated on Black women and check it out.
10. Do a Live giveaway
Conducting a Live giveaway helps you build brand awareness and recognition as they incite a lot of shares, engagements, and visits to your page.
Mo Gilligan, a comedian, improved his reach and built his brand awareness by conducting regular giveaways during the quarantine. His live sessions were called the Quarantine Games, and they included fun games the audience could play to win gifts. Since anyone could join his live and win, viewers felt more motivated to engage with his posts. Here’s a snippet from one of his live shows.
Wrapping up
Instagram Live will ignite your visibility and help your business get discovered by potential prospects. It also gets you on the algorithm's good side, and you get pushed to the front of everyone's stories in your followers' feed. But creating an IG live that imparts value and builds trust isn't easy. This is why this guide includes everything you need from planning your Live to repurposing it to the 10 IG live ideas that'll help you get started.
If you want to learn more about other Instagram formats like posts, stories, and Reels, simply click the link to learn more. And if you prefer learning via videos, you should check out our YouTube channel, where we share daily video creation tips and tricks, the latest video trends and ideas, and help you make more money as a video creator.

